Difference between revisions of "LXDM Configuration"
Views
Actions
Namespaces
Variants
Tools
imported>Cscs |
(Applied Cmd templates to commands and file content) |
||
| Line 1: | Line 1: | ||
= Overview = | = Overview = | ||
{| | |||
[[file:Lxdm-login.png|thumb|left|454px]] | |- | ||
| [[file:Lxdm-login.png|thumb|left|454px|Unthemed LXDM]] || {{BoxInfo|TIP|More customization options are available if choosing to manually edit the LXDM configuration file.}} | |||
{{ | |||
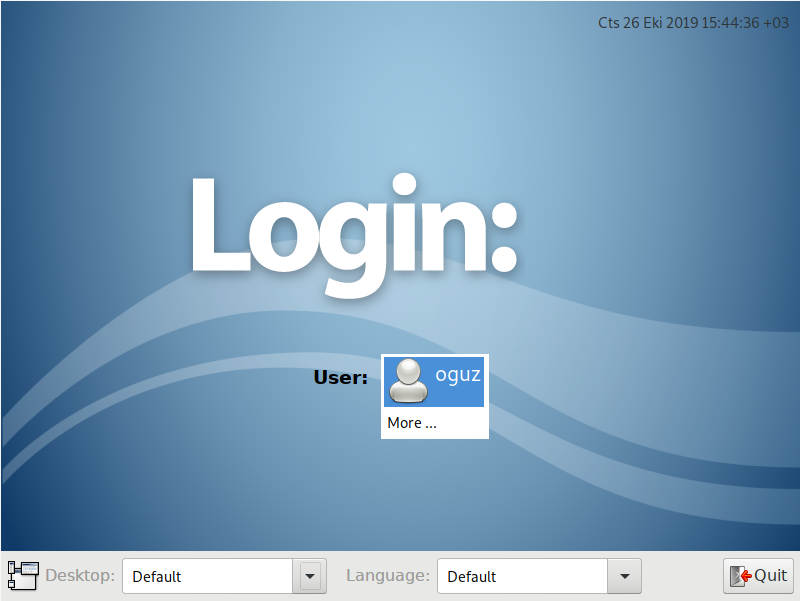
LXDM is responsible for providing the login screen, where your preferred language and desktop environment may be selected for your personal user account(s). It also functions as a protective security barrier to prevent unauthorized access to your system. | LXDM is responsible for providing the login screen, where your preferred language and desktop environment may be selected for your personal user account(s). It also functions as a protective security barrier to prevent unauthorized access to your system. | ||
LXDM can still be easily customized to suit personal taste and preference, including the ability to enable auto-login, change the background image, remove the language menu, and disable the user list. | LXDM can still be easily customized to suit personal taste and preference, including the ability to enable auto-login, change the background image, remove the language menu, and disable the user list. | ||
|} | |||
=Option 1: Using the Customisation Tool= | =Option 1: Using the Customisation Tool= | ||
{| | |||
[[file:Lxdm-config.jpg|thumb|left|454px]] | |- | ||
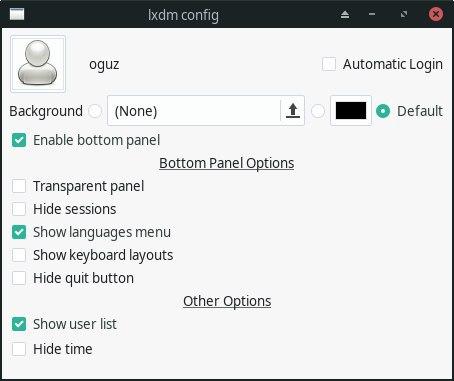
|[[file:Lxdm-config.jpg|thumb|left|454px| LXDM configuration tool]] || The '''LXDM Configuration''' application may be found under '''System''' in the XFCE and Cinnamon Menus. Openbox users will also find it under ''System'' if using the Openbox ''AppFinder'' application. Alternatively, searching for '''lxdm''' in ''Synapse'' will yield the correct result. | |||
To launch from the commandline use | |||
The '''LXDM Configuration''' application may be found under '''System''' in the XFCE and Cinnamon Menus. Openbox users will also find it under ''System'' if using the Openbox ''AppFinder'' application. Alternatively, searching for '''lxdm''' in ''Synapse'' will yield the correct result. | {{UserCmd|command=sudo lxdm-config}} | ||
|} | |||
=Option 2: Manually Editing the Configuration File= | =Option 2: Manually Editing the Configuration File= | ||
To undertake any or all of these tasks, it will be necessary to first open the ''LXDM configuration file'' (lxdm.conf) using the terminal. The syntax of the command to open the LXDM configuration file is: | To undertake any or all of these tasks, it will be necessary to first open the ''LXDM configuration file'' (lxdm.conf) using the terminal. The syntax of the command to open the LXDM configuration file is: | ||
{{UserCmd|command=sudo [text editor] /etc/lxdm/lxdm.conf}} | |||
For example, if you wish to edit the file within the terminal using nano (a standard terminal-based text editor) then enter: | For example, if you wish to edit the file within the terminal using nano (a standard terminal-based text editor) then enter: | ||
{{UserCmd|command=sudo nano /etc/lxdm/lxdm.conf}} | |||
Otherwise - if you have installed the full version of Manjaro (i.e. not the NET-Edition) - you may find it easier to use the pre-installed ''gedit'' text editor instead. This will open the configuration file up as a document, making it easier to read and edit. To use ''gedit'' instead, enter: | Otherwise - if you have installed the full version of Manjaro (i.e. not the NET-Edition) - you may find it easier to use the pre-installed ''gedit'' text editor instead. This will open the configuration file up as a document, making it easier to read and edit. To use ''gedit'' instead, enter: | ||
{{UserCmd|command=sudo gedit /etc/lxdm/lxdm.conf}} | |||
==Enabling Auto-Login== | ==Enabling Auto-Login== | ||
{{BoxInfo|Info|Auto-login will only work upon booting up into Manjaro. Otherwise, upon logging out, it will still be necessary to enter your username and password credentials to get back into your desktop environment.}} | |||
{{ | |||
It is possible to bypass the login screen completely and go straight into your chosen desktop environment upon booting up Manjaro. To do so, two basic steps are required: first, it will be necessary to set the user account to be automatically logged into, and second, it will then be necessary to state the particular desktop environment to be started. | It is possible to bypass the login screen completely and go straight into your chosen desktop environment upon booting up Manjaro. To do so, two basic steps are required: first, it will be necessary to set the user account to be automatically logged into, and second, it will then be necessary to state the particular desktop environment to be started. | ||
===Step 1: Set the User=== | ===Step 1: Set the User=== | ||
The first step is to set your personal account to be automatically logged in. This is undertaken in the following section, located at the top of the LXDM configuration file: | The first step is to set your personal account to be automatically logged in. This is undertaken in the following section, located at the top of the LXDM configuration file: | ||
{{File|file=/etc/lxdm/lxdm.conf|content=<pre> | |||
[base] | |||
## uncomment and set autologin username to enable autologin | |||
# autologin=dgod</pre>}} | |||
As an example, LXDM has been configured below to enable a personal user account named 'carl' to be logged in automatically: | As an example, LXDM has been configured below to enable a personal user account named 'carl' to be logged in automatically: | ||
{{File|file=/etc/lxdm/lxdm.conf|content=<pre> | |||
[base] | |||
## uncomment and set autologin username to enable autologin | |||
autologin=carl</pre>}} | |||
Ensure that there are no spaces between the '''autologin=''' command and the name of your personal user account. Once complete, the second and final step of setting the default desktop environment to be automatically started must be undertaken. | Ensure that there are no spaces between the '''autologin=''' command and the name of your personal user account. Once complete, the second and final step of setting the default desktop environment to be automatically started must be undertaken. | ||
===Step 2: Set the Desktop Environment=== | ===Step 2: Set the Desktop Environment=== | ||
It is necessary to ensure what desktop environment is to be booted into, particularly if having installed the NET-edition of Manjaro, and/or if having installed multiple desktop environments. This is set in the following section, located near the top of the configuration file: | It is necessary to ensure what desktop environment is to be booted into, particularly if having installed the NET-edition of Manjaro, and/or if having installed multiple desktop environments. This is set in the following section, located near the top of the configuration file: | ||
{{File|file=/etc/lxdm/lxdm.conf|content=<pre> | |||
## default session or desktop used when no systemwide config | |||
session=/usr/bin/startxfce4</pre>}} | |||
In this example, the default desktop environment has already been set to XFCE as this was the Manjaro edition installed. If you have installed a different edition (e.g. Gnome/Cinnamon or KDE), then the session listed will be different. Where there is not a hash ('#') at the beginning of '''session=''' (meaning this command won't be ignored), and the desired desktop environment has been listed, then you may save your changes and close the configuration file by: | |||
In this example, the default desktop environment has already been set to XFCE as this was the Manjaro | |||
* '''nano''': Press CTRL and 'x' to exit, 'y' to save, and <enter> to finish, or | * '''nano''': Press CTRL and 'x' to exit, 'y' to save, and <enter> to finish, or | ||
* '''gedit''': Select the 'save' option and then close the window. | * '''gedit''': Select the 'save' option and then close the window. | ||
Otherwise, to set the desired desktop environment: | Otherwise, to set the desired desktop environment: | ||
'''1.''' If present, remove the hash ('#') at the beginning of '''session=''' | '''1.''' If present, remove the hash ('#') at the beginning of '''session=''' | ||
'''2.''' Remove the existing desktop environment listed (or any other text such as 'lxdm') from '''session=/usr/bin/<font color ="red">[text to be removed]</font color>''', and | '''2.''' Remove the existing desktop environment listed (or any other text such as 'lxdm') from '''session=/usr/bin/<font color ="red">[text to be removed]</font color>''', and | ||
'''3.''' Add the command to start your chosen / installed desktop envrionment at the end of '''session=/usr/bin/'''. An example for every officially supported desktop environment has been listed below: | '''3.''' Add the command to start your chosen / installed desktop envrionment at the end of '''session=/usr/bin/'''. An example for every officially supported desktop environment has been listed below: | ||
* '''To start XFCE''': | * '''To start XFCE''': | ||
{{File|file=/etc/lxdm/lxdm.conf|content=<pre> | |||
## default session or desktop used when no systemwide config | |||
session=/usr/bin/startxfce4</pre>}} | |||
* '''To start KDE''': | * '''To start KDE''': | ||
{{File|file=/etc/lxdm/lxdm.conf|content=<pre> | |||
## default session or desktop used when no systemwide config | |||
session=/usr/bin/startplasma-x11</pre>}} | |||
* '''To start Gnome''': | * '''To start Gnome''': | ||
{{File|file=/etc/lxdm/lxdm.conf|content=<pre> | |||
## default session or desktop used when no systemwide config | |||
session=/usr/bin/gnome-session</pre>}} | |||
* '''To start Cinnamon''': | * '''To start Cinnamon''': | ||
{{File|file=/etc/lxdm/lxdm.conf|content=<pre> | |||
## default session or desktop used when no systemwide config | |||
session=/usr/bin/gnome-session-cinnamon</pre>}} | |||
* '''To start Razor-QT''': | * '''To start Razor-QT''': | ||
{{File|file=/etc/lxdm/lxdm.conf|content=<pre> | |||
## default session or desktop used when no systemwide config | |||
session=/usr/bin/razor-session</pre>}} | |||
* '''To start Openbox''': | * '''To start Openbox''': | ||
{{File|file=/etc/lxdm/lxdm.conf|content=<pre> | |||
## default session or desktop used when no systemwide config | |||
session=/usr/bin/openbox-session</pre>}} | |||
* '''To start LXDE''': | * '''To start LXDE''': | ||
{{File|file=/etc/lxdm/lxdm.conf|content=<pre> | |||
## default session or desktop used when no systemwide config | |||
session=/usr/bin/lxsession</pre>}} | |||
Once your amendments have been completed, you can save your changes and close the configuration file by: | Once your amendments have been completed, you can save your changes and close the configuration file by: | ||
* '''nano''': Press CTRL and 'x' to exit, 'y' to save, and <enter> to finish, or | * '''nano''': Press CTRL and 'x' to exit, 'y' to save, and <enter> to finish, or | ||
* '''gedit''': Select the 'save' option and then close the window. | * '''gedit''': Select the 'save' option and then close the window. | ||
Reboot your system for the changes to take effect. | Reboot your system for the changes to take effect. | ||
===Optional: Enable Timeout Auto-Login=== | ===Optional: Enable Timeout Auto-Login=== | ||
{{BoxInfo|Info|The basic auto-login feature itself must also be enabled to enable this feature in turn. In addition, this feature also only works upon first booting up into Manjaro.}} | |||
{{ | |||
In addition to bypassing the login screen completely, it is also possible to be automatically logged in after waiting a certain period of time as well. In this instance, after booting into the login screen, it will wait for a set period of time before automatically logging you in. This is set in the following section, located near the top of the configuration file: | In addition to bypassing the login screen completely, it is also possible to be automatically logged in after waiting a certain period of time as well. In this instance, after booting into the login screen, it will wait for a set period of time before automatically logging you in. This is set in the following section, located near the top of the configuration file: | ||
{{File|file=/etc/lxdm/lxdm.conf|content=<pre> | |||
## uncomment and set timeout to enable timeout autologin, | |||
## the value should >=5 | |||
#timeout=10</pre>}} | |||
'''1.''' Remove the hash ('#') from the beginning of '''timeout=''' to activate it, and | '''1.''' Remove the hash ('#') from the beginning of '''timeout=''' to activate it, and | ||
'''2.''' Set the number of '''seconds''' to wait at the login screen, if different from the default value of 10. As stated above the command, the number of seconds specified must be no less than 5. | '''2.''' Set the number of '''seconds''' to wait at the login screen, if different from the default value of 10. As stated above the command, the number of seconds specified must be no less than 5. | ||
As an example, LXDM has been configured below to enable timeout auto login after waiting 30 seconds: | As an example, LXDM has been configured below to enable timeout auto login after waiting 30 seconds: | ||
{{File|file=/etc/lxdm/lxdm.conf|content=<pre> | |||
## uncomment and set timeout to enable timeout autologin, | |||
## the value should >=5 | |||
timeout=30</pre>}} | |||
Once your amendments have been completed, you can save your changes and close the configuration file by: | Once your amendments have been completed, you can save your changes and close the configuration file by: | ||
* '''nano''': Press CTRL and 'x' to exit, 'y' to save, and <enter> to finish, or | * '''nano''': Press CTRL and 'x' to exit, 'y' to save, and <enter> to finish, or | ||
* '''gedit''': Select the 'save' option and then close the window. | * '''gedit''': Select the 'save' option and then close the window. | ||
Reboot your system for the changes to take effect. | Reboot your system for the changes to take effect. | ||
=== Disable Auto-Login === | === Disable Auto-Login === | ||
To restore the login screen, edit the LXDM configuration file once again and comment out the lines beginning with '''autologin=''' and '''session='''. An example has provided below. | To restore the login screen, edit the LXDM configuration file once again and comment out the lines beginning with '''autologin=''' and '''session='''. An example has provided below. | ||
{{File|file=/etc/lxdm/lxdm.conf|content=<pre> | |||
[base] | |||
## uncomment and set autologin username to enable autologin | |||
#session=/usr/bin/startxfce4 | |||
... | |||
## default session or desktop used when no systemwide config | |||
#session=/usr/bin/openbox</pre>}} | |||
Once your amendments have been completed save your changes and close the configuration file by: | Once your amendments have been completed save your changes and close the configuration file by: | ||
*'''nano''': Press CTRL and 'x' to exit, 'y' to save, and <enter> to finish, or | *'''nano''': Press CTRL and 'x' to exit, 'y' to save, and <enter> to finish, or | ||
*'''gedit''': Select the 'save' option and then close the window. | *'''gedit''': Select the 'save' option and then close the window. | ||
==Changing The Background Image== | ==Changing The Background Image== | ||
{{BoxInfo|Info|As illustrated below, using the File Manager can make this task much simplier and easier, particularly for new users. Please note that Linux is also case-sensitive so ensure that upper and lower case letters are used correctly.}} | |||
{{ | |||
Once your chosen desktop environmet has been downloaded (e.g. a ''.png'' or ''.jpg'' image file), it can be set in the following section, located near the top of the configuration file: | Once your chosen desktop environmet has been downloaded (e.g. a ''.png'' or ''.jpg'' image file), it can be set in the following section, located near the top of the configuration file: | ||
{{File|file=/etc/lxdm/lxdm.conf|content=<pre> | |||
## background of the greeter | |||
# bg=/usr/share/backgrounds/default.png</pre>}} | |||
{| | |||
[[file:newpathway.png|thumb|left|375px]] | |- | ||
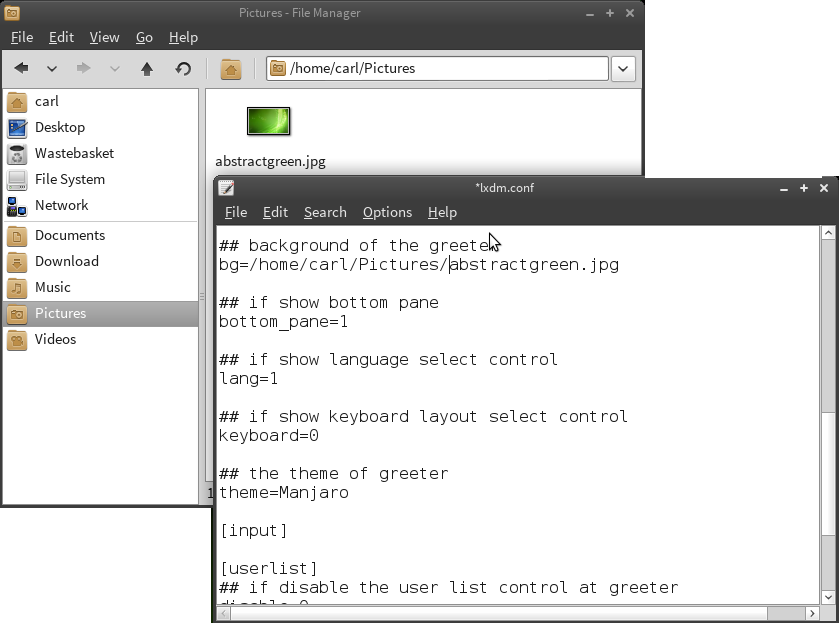
| [[file:newpathway.png|thumb|left|375px|Path to background]] || As illustrated, it will be necessary to specify the exact location of the background image to use. Although it is possible to copy the new background images to the existing '''backgrounds''' folder using Root privilages, in this instance a new folder location will be specified: | |||
As illustrated, it will be necessary to specify the exact location of the background image to use. Although it is possible to copy the new background images to the existing '''backgrounds''' folder using Root privilages, in this instance a new folder location will be specified: | |||
'''1.''' Open your file manager and locate the folder containing the desired background image. The full location should then be listed in the address bar (e.g. in this instance it is ''/home/carl/Pictures'') | '''1.''' Open your file manager and locate the folder containing the desired background image. The full location should then be listed in the address bar (e.g. in this instance it is ''/home/carl/Pictures'') | ||
'''2.''' Remove the hash ('#') from the beginning of '''bg=''' to activate it | '''2.''' Remove the hash ('#') from the beginning of '''bg=''' to activate it | ||
'''3.''' Remove the existing location and image file specified after the '''bg=''' command (e.g. bg=<font color ="red">/usr/share/backgrounds/default.png</font color>) | '''3.''' Remove the existing location and image file specified after the '''bg=''' command (e.g. bg=<font color ="red">/usr/share/backgrounds/default.png</font color>) | ||
'''4.''' Enter the new location of the image to use after the '''bg=''' command - by either manually typing it in or copying and pasting it from the address bar of the file manager - and ensure that it ends with a forwards slash (e.g. ''/home/carl/Pictures/''). | '''4.''' Enter the new location of the image to use after the '''bg=''' command - by either manually typing it in or copying and pasting it from the address bar of the file manager - and ensure that it ends with a forwards slash (e.g. ''/home/carl/Pictures/''). | ||
'''5.''' After the forwards slash, enter the full name of the image you wish to use, including the file type extension (e.g. ''/home/carl/Pictures/abstractgreen.jpg''). | '''5.''' After the forwards slash, enter the full name of the image you wish to use, including the file type extension (e.g. ''/home/carl/Pictures/abstractgreen.jpg''). | ||
|} | |||
{| | |||
[[file:abgreen.png|thumb|left|375px]] | |- | ||
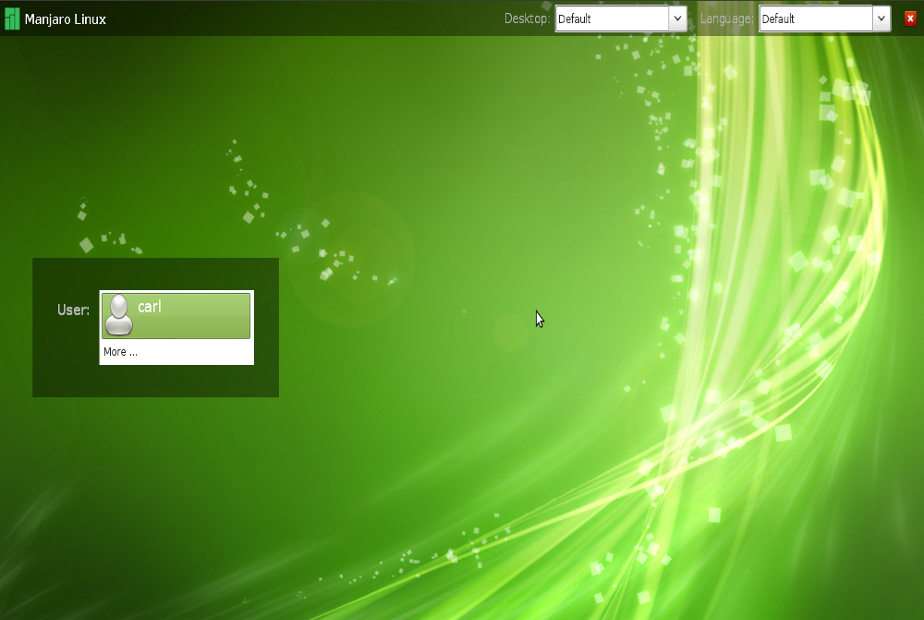
| [[file:abgreen.png|thumb|left|375px| new background image]] As an example, the author has activated the ability to set backgrounds, and used a background image (''abstractgreen.jpg'') located in their ''Pictures'' folder. Again, note the correct use of capitalisation where required (e.g. <u>P</u>ictures): | |||
{{File|file=/etc/lxdm/lxdm.conf|content=<pre> | |||
As an example, the author has activated the ability to set backgrounds, and used a background image (''abstractgreen.jpg'') located in their ''Pictures'' folder. Again, note the correct use of capitalisation where required (e.g. <u>P</u>ictures): | ## background of the greeter | ||
bg=/home/carl/Pictures/abstractgreen.jpg</pre>}} | |||
Once your amendments have been completed, you can save your changes and close the configuration file by: | Once your amendments have been completed, you can save your changes and close the configuration file by: | ||
* '''nano''': Press CTRL and 'x' to exit, 'y' to save, and <enter> to finish, or | * '''nano''': Press CTRL and 'x' to exit, 'y' to save, and <enter> to finish, or | ||
* '''gedit''': Select the 'save' option and then close the window. | * '''gedit''': Select the 'save' option and then close the window. | ||
The change will be immediate, and may be viewed by simply logging out. | The change will be immediate, and may be viewed by simply logging out. | ||
|} | |||
==Removing The Language Menu== | ==Removing The Language Menu== | ||
{| | |||
[[file:nolang.png|thumb|left|375px]] | |- | ||
| [[file:nolang.png|thumb|left|375px| Language menu ]] || By default the drop-down Language Menu is located in the top bar. As this may serve no purpose for many users it can easily be removed. Doing so may also improve the appearance of the login screen by consequently providing a cleaner, less cluttered appearance. This is undertaken in the following section, located at the bottom of the LXDM configuration file: | |||
{{File|file=/etc/lxdm/lxdm.conf|content=<pre> | |||
By default the drop-down Language Menu is located in the top bar. As this may serve no purpose for many users it can easily be removed. Doing so may also improve the appearance of the login screen by consequently providing a cleaner, less cluttered appearance. This is undertaken in the following section, located at the bottom of the LXDM configuration file: | ## if show language select control | ||
lang=1</pre>}} | |||
All that is required to replace the '1' after the '''lang=''' command with a '0': | All that is required to replace the '1' after the '''lang=''' command with a '0': | ||
{{File|file=/etc/lxdm/lxdm.conf|content=<pre> | |||
## if show language select control | |||
lang=0</pre>}} | |||
< | |||
Once your amendments have been completed, you can save your changes and close the configuration file by: | Once your amendments have been completed, you can save your changes and close the configuration file by: | ||
* '''nano''': Press CTRL and 'x' to exit, 'y' to save, and <enter> to finish, or | * '''nano''': Press CTRL and 'x' to exit, 'y' to save, and <enter> to finish, or | ||
* '''gedit''': Select the 'save' option and then close the window. | * '''gedit''': Select the 'save' option and then close the window. | ||
The change will be immediate, and may be viewed by simply logging out. | The change will be immediate, and may be viewed by simply logging out. | ||
|} | |||
==Disabling The User List== | ==Disabling The User List== | ||
{| | |||
[[file:nouser.png|thumb|left|375px]] | |- | ||
| [[file:nouser.png|thumb|left|375px| The user list]] || By default, available username(s) will already be listed for selection on the login screen. For added security - and (at least for some users) to improve the appearance of the login screen - this feature can be disabled. In this instance, it will consequently be necessary to manually enter both the username and password to log on. This is undertaken in the following section, located at the bottom of the LXDM configuration file: | |||
{{File|file=/etc/lxdm/lxdm.conf|content=<pre> | |||
By default, available username(s) will already be listed for selection on the login screen. For added security - and (at least for some users) to improve the appearance of the login screen - this feature can be disabled. In this instance, it will consequently be necessary to manually enter both the username and password to log on. This is undertaken in the following section, located at the bottom of the LXDM configuration file: | ## if disable the user list control at greeter | ||
disable=0</pre>}} | |||
All that is required to replace the '0' after the '''disable=''' command with a '1': | All that is required to replace the '0' after the '''disable=''' command with a '1': | ||
{{File|file=/etc/lxdm/lxdm.conf|content=<pre> | |||
## if disable the user list control at greeter | |||
disable=1</pre>}} | |||
< | |||
Once your amendments have been completed, you can save your changes and close the configuration file by: | Once your amendments have been completed, you can save your changes and close the configuration file by: | ||
* '''nano''': Press CTRL and 'x' to exit, 'y' to save, and <enter> to finish, or | * '''nano''': Press CTRL and 'x' to exit, 'y' to save, and <enter> to finish, or | ||
* '''gedit''': Select the 'save' option and then close the window. | * '''gedit''': Select the 'save' option and then close the window. | ||
|} | |||
[[Category:Contents Page]] | [[Category:Contents Page]] | ||
Revision as of 12:01, 20 March 2021
Overview
|
LXDM is responsible for providing the login screen, where your preferred language and desktop environment may be selected for your personal user account(s). It also functions as a protective security barrier to prevent unauthorized access to your system. LXDM can still be easily customized to suit personal taste and preference, including the ability to enable auto-login, change the background image, remove the language menu, and disable the user list. |
Option 1: Using the Customisation Tool
| The LXDM Configuration application may be found under System in the XFCE and Cinnamon Menus. Openbox users will also find it under System if using the Openbox AppFinder application. Alternatively, searching for lxdm in Synapse will yield the correct result.
To launch from the commandline use user $ sudo lxdm-config
|
Option 2: Manually Editing the Configuration File
To undertake any or all of these tasks, it will be necessary to first open the LXDM configuration file (lxdm.conf) using the terminal. The syntax of the command to open the LXDM configuration file is:
For example, if you wish to edit the file within the terminal using nano (a standard terminal-based text editor) then enter:
Otherwise - if you have installed the full version of Manjaro (i.e. not the NET-Edition) - you may find it easier to use the pre-installed gedit text editor instead. This will open the configuration file up as a document, making it easier to read and edit. To use gedit instead, enter:
Enabling Auto-Login
It is possible to bypass the login screen completely and go straight into your chosen desktop environment upon booting up Manjaro. To do so, two basic steps are required: first, it will be necessary to set the user account to be automatically logged into, and second, it will then be necessary to state the particular desktop environment to be started.
Step 1: Set the User
The first step is to set your personal account to be automatically logged in. This is undertaken in the following section, located at the top of the LXDM configuration file:
[base]
## uncomment and set autologin username to enable autologin
# autologin=dgod
As an example, LXDM has been configured below to enable a personal user account named 'carl' to be logged in automatically:
[base]
## uncomment and set autologin username to enable autologin
autologin=carl
Ensure that there are no spaces between the autologin= command and the name of your personal user account. Once complete, the second and final step of setting the default desktop environment to be automatically started must be undertaken.
Step 2: Set the Desktop Environment
It is necessary to ensure what desktop environment is to be booted into, particularly if having installed the NET-edition of Manjaro, and/or if having installed multiple desktop environments. This is set in the following section, located near the top of the configuration file:
## default session or desktop used when no systemwide config
session=/usr/bin/startxfce4
In this example, the default desktop environment has already been set to XFCE as this was the Manjaro edition installed. If you have installed a different edition (e.g. Gnome/Cinnamon or KDE), then the session listed will be different. Where there is not a hash ('#') at the beginning of session= (meaning this command won't be ignored), and the desired desktop environment has been listed, then you may save your changes and close the configuration file by:
- nano: Press CTRL and 'x' to exit, 'y' to save, and <enter> to finish, or
- gedit: Select the 'save' option and then close the window.
Otherwise, to set the desired desktop environment: 1. If present, remove the hash ('#') at the beginning of session= 2. Remove the existing desktop environment listed (or any other text such as 'lxdm') from session=/usr/bin/[text to be removed], and 3. Add the command to start your chosen / installed desktop envrionment at the end of session=/usr/bin/. An example for every officially supported desktop environment has been listed below:
- To start XFCE:
## default session or desktop used when no systemwide config
session=/usr/bin/startxfce4
- To start KDE:
## default session or desktop used when no systemwide config
session=/usr/bin/startplasma-x11
- To start Gnome:
## default session or desktop used when no systemwide config
session=/usr/bin/gnome-session
- To start Cinnamon:
## default session or desktop used when no systemwide config
session=/usr/bin/gnome-session-cinnamon
- To start Razor-QT:
## default session or desktop used when no systemwide config
session=/usr/bin/razor-session
- To start Openbox:
## default session or desktop used when no systemwide config
session=/usr/bin/openbox-session
- To start LXDE:
## default session or desktop used when no systemwide config
session=/usr/bin/lxsession
Once your amendments have been completed, you can save your changes and close the configuration file by:
- nano: Press CTRL and 'x' to exit, 'y' to save, and <enter> to finish, or
- gedit: Select the 'save' option and then close the window.
Reboot your system for the changes to take effect.
Optional: Enable Timeout Auto-Login
In addition to bypassing the login screen completely, it is also possible to be automatically logged in after waiting a certain period of time as well. In this instance, after booting into the login screen, it will wait for a set period of time before automatically logging you in. This is set in the following section, located near the top of the configuration file:
## uncomment and set timeout to enable timeout autologin,
## the value should >=5
#timeout=10
1. Remove the hash ('#') from the beginning of timeout= to activate it, and 2. Set the number of seconds to wait at the login screen, if different from the default value of 10. As stated above the command, the number of seconds specified must be no less than 5. As an example, LXDM has been configured below to enable timeout auto login after waiting 30 seconds:
## uncomment and set timeout to enable timeout autologin,
## the value should >=5
timeout=30
Once your amendments have been completed, you can save your changes and close the configuration file by:
- nano: Press CTRL and 'x' to exit, 'y' to save, and <enter> to finish, or
- gedit: Select the 'save' option and then close the window.
Reboot your system for the changes to take effect.
Disable Auto-Login
To restore the login screen, edit the LXDM configuration file once again and comment out the lines beginning with autologin= and session=. An example has provided below.
[base]
## uncomment and set autologin username to enable autologin
#session=/usr/bin/startxfce4
...
## default session or desktop used when no systemwide config
#session=/usr/bin/openbox
Once your amendments have been completed save your changes and close the configuration file by:
- nano: Press CTRL and 'x' to exit, 'y' to save, and <enter> to finish, or
- gedit: Select the 'save' option and then close the window.
Changing The Background Image
Once your chosen desktop environmet has been downloaded (e.g. a .png or .jpg image file), it can be set in the following section, located near the top of the configuration file:
## background of the greeter
# bg=/usr/share/backgrounds/default.png
| As illustrated, it will be necessary to specify the exact location of the background image to use. Although it is possible to copy the new background images to the existing backgrounds folder using Root privilages, in this instance a new folder location will be specified:
1. Open your file manager and locate the folder containing the desired background image. The full location should then be listed in the address bar (e.g. in this instance it is /home/carl/Pictures) 2. Remove the hash ('#') from the beginning of bg= to activate it 3. Remove the existing location and image file specified after the bg= command (e.g. bg=/usr/share/backgrounds/default.png) 4. Enter the new location of the image to use after the bg= command - by either manually typing it in or copying and pasting it from the address bar of the file manager - and ensure that it ends with a forwards slash (e.g. /home/carl/Pictures/). 5. After the forwards slash, enter the full name of the image you wish to use, including the file type extension (e.g. /home/carl/Pictures/abstractgreen.jpg). |
| As an example, the author has activated the ability to set backgrounds, and used a background image (abstractgreen.jpg) located in their Pictures folder. Again, note the correct use of capitalisation where required (e.g. Pictures):
/etc/lxdm/lxdm.conf ## background of the greeter bg=/home/carl/Pictures/abstractgreen.jpg Once your amendments have been completed, you can save your changes and close the configuration file by:
The change will be immediate, and may be viewed by simply logging out. |
Removing The Language Menu
| By default the drop-down Language Menu is located in the top bar. As this may serve no purpose for many users it can easily be removed. Doing so may also improve the appearance of the login screen by consequently providing a cleaner, less cluttered appearance. This is undertaken in the following section, located at the bottom of the LXDM configuration file:
/etc/lxdm/lxdm.conf ## if show language select control lang=1 All that is required to replace the '1' after the lang= command with a '0': /etc/lxdm/lxdm.conf ## if show language select control lang=0 Once your amendments have been completed, you can save your changes and close the configuration file by:
The change will be immediate, and may be viewed by simply logging out. |
Disabling The User List
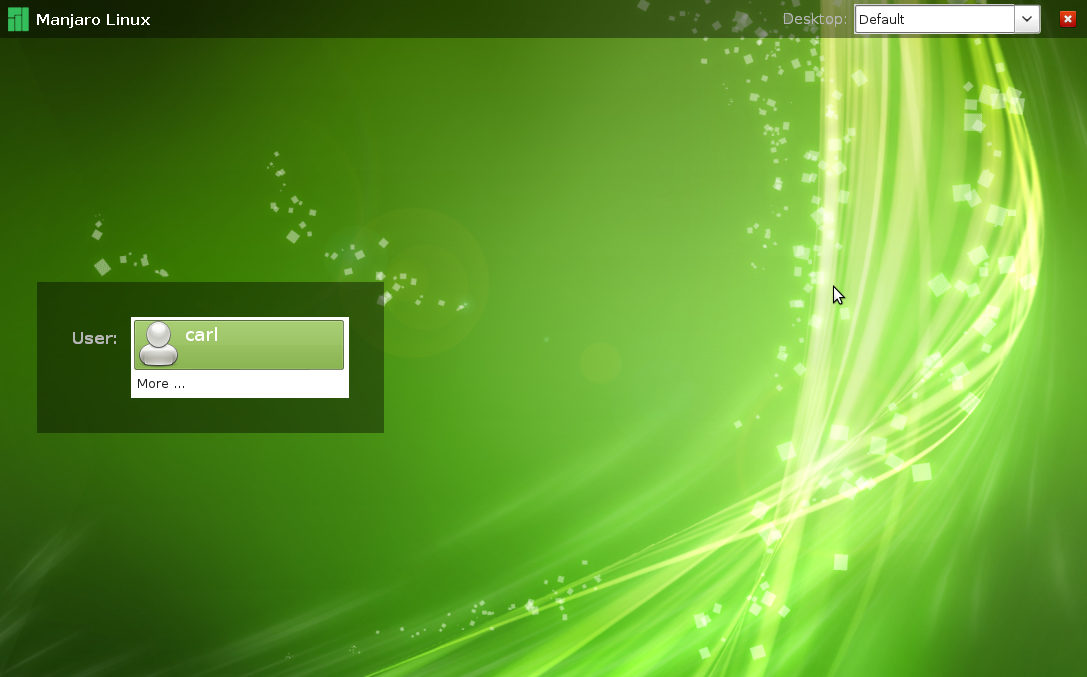
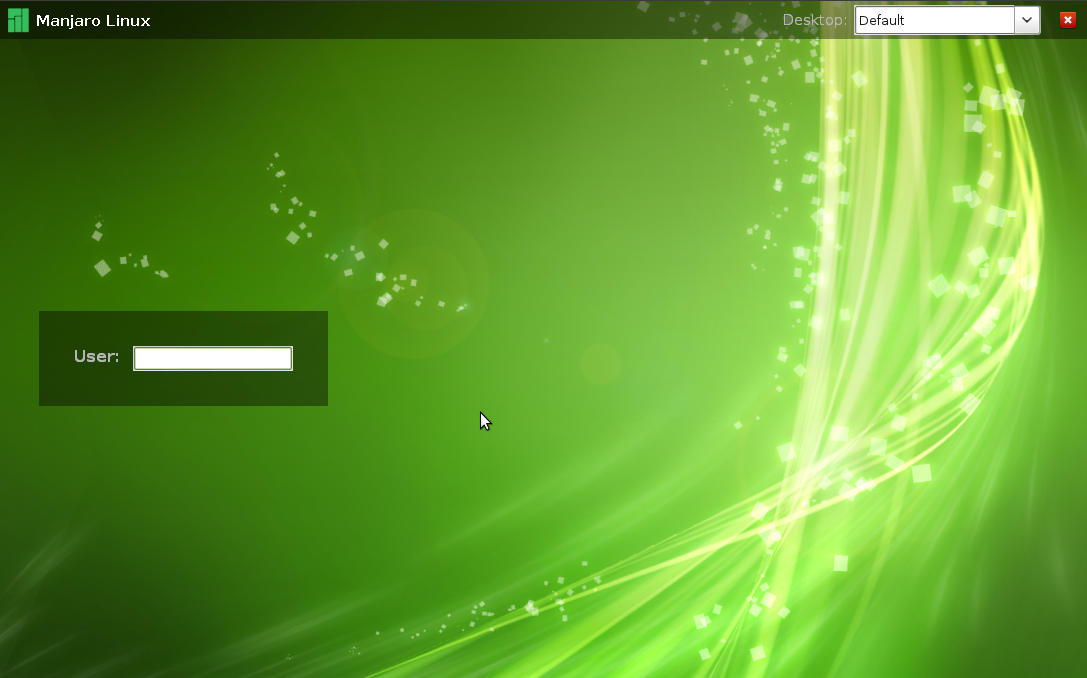
| By default, available username(s) will already be listed for selection on the login screen. For added security - and (at least for some users) to improve the appearance of the login screen - this feature can be disabled. In this instance, it will consequently be necessary to manually enter both the username and password to log on. This is undertaken in the following section, located at the bottom of the LXDM configuration file:
/etc/lxdm/lxdm.conf ## if disable the user list control at greeter disable=0 All that is required to replace the '0' after the disable= command with a '1': /etc/lxdm/lxdm.conf ## if disable the user list control at greeter disable=1 Once your amendments have been completed, you can save your changes and close the configuration file by:
|
