Difference between revisions of "Virt-manager/ru"
Views
Actions
Namespaces
Variants
Tools
(Created page with "= Установите virt-manager, qemu и все зависимости= <br clear="all" /> Через терминал: sudo pacman -S --needed virt-manager qemu-desktop...") |
(Created page with "==Установка гостевых дополнений== После запуска и работы виртуальной машины необходимо установ...") |
||
| Line 101: | Line 101: | ||
</div> | </div> | ||
==Установка гостевых дополнений== | |||
После запуска и работы виртуальной машины необходимо установить [https://www.spice-space.org/download.html spice guest tools]. | |||
<br clear="all" /> | <br clear="all" /> | ||
Для Windows это один пакет: spice-guest-tools-xxxx.exe | |||
<br clear="all" /> | <br clear="all" /> | ||
Для linux это: spice-vdagent и xf86-video-qxl. Если вы используете дистрибутив linux, то можете установить их с помощью менеджера пакетов. | |||
<br clear="all" /> | <br clear="all" /> | ||
Посетите: '''[http://www.spice-space.org/download.html страницу загрузки Spice]''' | |||
<div lang="en" dir="ltr" class="mw-content-ltr"> | <div lang="en" dir="ltr" class="mw-content-ltr"> | ||
Revision as of 06:07, 15 February 2023
Обзор
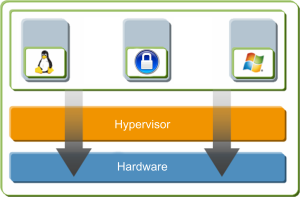
Virt-manager использует libvirt и является менеджером многих гипервизоров, включая тот, который мы хотим использовать здесь: QEMU/KVM.
Зачем мне нужна виртуализация?
- Чтобы узнать о новой ОС
- Для настройки оборудования, которое имеет настройки только для этой операционной системы
- Для использования программного обеспечения, которое работает только на другой
Я хочу знать больше
1. Виртуализация
2. Гипервизор
3. Виртуальная машина
Что мы точно должны знать
1. Какой у меня процессор. Определите его и убедитесь, что он как минимум четырехъядерный. ПОСМОТРИТЕ НА CPU-World
2. Проверьте, включены ли "параметры виртуализации" в BIOS, используя
LC_ALL=C lscpu | grep Virtualization
3. Сколько у меня памяти. Проверьте оперативную память и убедитесь, что она составляет не менее 4 ГБ.
4. Количество свободного места на жестком диске. Виртуальная машина может использовать файл образа диска, поэтому дополнительные разделы не нужны.
5. Минимальные требования к аппаратному обеспечению операционной системы, которую вы хотите установить в качестве виртуальной машины.
Установите virt-manager, qemu и все зависимости
Через терминал:
sudo pacman -S --needed virt-manager qemu-desktop libvirt edk2-ovmf dnsmasq iptables-nft
Для поддержки TPM:
sudo pacman -S --asdeps swtpm
Добавить в автозапуск и запустить службу:
sudo systemctl enable libvirtd.service
sudo systemctl start libvirtd.service
Добавьте пользователя в группу libvirt для использования виртуальных машин уровня system (qemu:///system)
sudo usermod -a -G libvirt $USER
Using Virt-Manager for guest creation
0. Prepare installation image. If you're going to install Windows, prepare the Virtio driver image too.
1. Launch menu Virtual Machine Manager. It should already have a LXC connection. You can disconnect and remove it if you don't use LXC.
2. Go to File, choose Add Connection and choose hypervisor QEMU/KVM, or QEMU/KVM user session if you don't want system-level virtual machines. Click on connect.
3. You need directory pools to store the disk images of virtual machines or the ISO file of CD/DVD. Double click qemu/kvm, go on storage and add by clicking + the path to the folder where you have the iso and the folder where create the virtual machine.
4. Click on create a new virtual machine: select Local install media (ISO image or CDROM), and select the installation ISO image and OS type (if not detected).
5. How many CPU assign and how much memory? (check the recommended requirements of O.S. that you are installing)
6. Create the file system of the virtual machine by selecting Select or create custom storage and click Manage.... Under your desired directory pool, create the volume of the virtual machine (default in qcow2 format). How many GB? Check the recommended requirements O.S. you install.
7.Assign a name to the machine and flag customize configuration before install. You have access to the screen with all the hardware that will be virtualized, do a check if there is all that is needed to initialize and launch the installer.
8. In Overview, change the firmware to UEFI for future-proof capacity.
9. Change the type of SATA Disk 1 (the disk image of the creating virtual machine) to virtio for better performance. Change discard mode to unmap, and then apply the change. You should notice the device name would change from SATA Disk 1 to VirtIO Disk 1.
10. Set the NIC type to virtio too for better network performance.
11. Add TPM chip, select TIS model through Emulated device backend.
12. Add a watchdog to reboot the guest when it hangs. Leave the settings as default.
13. And a hardware RNG, to get entropy from the host.
14. Click on the top to start installation.
Установка гостевых дополнений
После запуска и работы виртуальной машины необходимо установить spice guest tools.
Для Windows это один пакет: spice-guest-tools-xxxx.exe
Для linux это: spice-vdagent и xf86-video-qxl. Если вы используете дистрибутив linux, то можете установить их с помощью менеджера пакетов.
Посетите: страницу загрузки Spice
Tune the display settings
The default model of display card is QXL. If your virtual machine is Linux system, you can change it to virtio and enable 3D acceleration for better graphic performance.
Windows virtual machine, however doesn't support virtio display yet. Nevertheless, we can increase its VGA memory from the default 16 MB to 64 MB to allow higher display resolution and slightly better 2D graphical performance.
To do so, we need to edit the XML file of the virtual machine.
- In virt-manager, go to edit > preference, and check Enable XML edit.
- In virtual machine details, go to display card. Under the XML tab, change the value of vgamem to 65536, then apply the change.
File sharing between host and guest
For Linux guests, Virtio-FS and 9p are available for file sharing. See ArchWiki for more information.
For Windows guest, the easiest way to share file between host and guest is through SAMBA.
- Create a SAMBA usershare
- In Windows guest, enter \\192.168.122.1 in the file explorer, and you should be able to see the usershare on your host.
- Map that SAMBA usershare to a new drive, and connect to it with the appropriate credential. That's it.
Check this article for more information.
Оптимизация vCPU
Посмотрите эту статью, как настроить топологию vCPU для лучшей производительности.
Например, мой процессор имеет 1 сокет, 8 ядер и 16 потоков. Автоматическая топология назначает моему гостю 4 сокета, 1 ядро и 1 поток. После изменения на 1 сокет, 4 ядра и 1 поток производительность значительно увеличивается.


