防火墙
绪论
建议您运行本地防火墙,即使您已经处于网络防火墙的保护之下。本地防火墙将保护你免受内网中威胁的影响。
不复杂的防火墙(Uncomplicated FireWall)
UFW表示简单的防火墙,作为一个对netfilter防火墙的的包装。它提供了一个命令行界面,旨在简单易用。UFW远比iptables更加简单;除非你有特殊需求,使用UFW是最佳选择。
安装UFW
您可以使用任何包管理器安装UFW,如 pamac install ufw
一旦UFW安装好了,您需要使用一下命令启动您的防火墙:
sudo systemctl enable ufw.service
sudo ufw enable
添加规则
想要看见目前的设置,可以输入 ufw status。 如果您是第一次安装,命令行中应当有如下输出:
sudo ufw status verbose
Status: active
Logging: on (low)
Default: deny (incoming), allow (outgoing), disabled (routed)
New profiles: skip
这表示它将阻止所有传入流量并允许所有传出流量。这在大多数情况下是一个很好的起点。但是,您通常希望允许一些传入的流量。这可以通过命令 UFW允许来完成。例如,如果您想要允许传入的SSH流量,所以您可以从网络上的其他机器连接到这台机器,您可以使用:
sudo ufw allow ssh
If we wanted to also tcp connections to a local webserver on a non-standard https port, 8443. We could use the command:
sudo ufw allow in 8443/tcp
UFW and Applications
You may notice a difference in the above two commands. When we built the rules for ssh we used the name and for https we used the port number, 8443. This is because UFW has a small database of applications it knows the ports for. You can see the list with the command:
sudo ufw app list
For applications on the list you can add them by name. If you want to review the configuration for one of the applications, you can use the command ufw app info. For example, to the configuration for ssh:
sudo ufw app info SSH
Profile: SSH
Title: SSH server
Description: SSH server

Port:
  22/tcp
Some additional preconfigured applications can be added by installing the package ufw-extras with your favorite package manager or the command:
pamac install ufw-extras
Removing Rules
Rules can be removed with the ufw delete command. For example, to delete our 8443 rules we could use the command:
sudo ufw delete allow 8443/tcp
You can also delete them by number. This is easier if you have a numbered list which you can see with the command:
sudo ufw status numbered
Status: active

     To                         Action      From
     --                         ------      ----
[ 1] 22                         ALLOW IN    Anywhere
[ 2] 22 (v6)                    ALLOW IN    Anywhere (v6)
Now if we wanted to stop allowing ssh on ipv6 we could use the command:
sudo ufw delete 2
GUFW
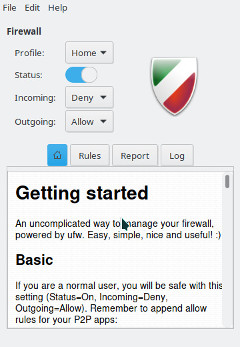
Prefer to use GUI applications and still want to manage your firewall? No problem. GUFW is a GTK front-end for UFW that aims to make managing a Linux firewall as accessible and easy as possible. It features pre-sets for common ports and p2p applications.
If it is not installed already gufw can be installed from the repos:
pamac install gufw
It will now be available in the menu as Firewall Configuration or by running gufw directly.
iptables
iptables is included as part of the Linux kernel. iptables is significantly more complicated than using a tool like UFW. As a result, a full tutorial on iptables is beyond the scope of this wiki. Using iptables on Manjaro should be the same for every distribution of Linux so there is plenty of available documentation. Some of this is linked below. Here are some basics to get you started.
To enable loading rules on startup you can use the command:
sudo systemctl enable iptables.service
This will load the rules from the file /etc/iptables/iptables.rules.
To display the currently loaded rules:
sudo iptables -L
To save the current rules to a file
sudo sh -c "iptables-save > /etc/iptables/iptables.rules"
To load the rules from a file
sudo sh -c "iptables-restore > /etc/iptables/iptables.rules"
To allow ssh connections
sudo iptables -A INPUT -p tcp --dport 22 -m conntrack --ctstate NEW,ESTABLISHED -j ACCEPT
sudo iptables -A OUTPUT -p tcp --sport 22 -m conntrack --ctstate ESTABLISHED -j ACCEPT
See Also
- The Arch Wiki on UFW
- The UFW website
- The GUFW website
- The iptables man page
- The Arch Wiki on iptables
- The Debian Wiki on iptables
