Difference between revisions of "Worker - An Introduction"
Views
Actions
Namespaces
Variants
Tools
imported>Handy |
m (align - center) |
||
| (28 intermediate revisions by 4 users not shown) | |||
| Line 1: | Line 1: | ||
<languages/> | |||
[[File: A.Worker.Setup.png|centre|650px]] | |||
__TOC__ | |||
<br clear="all"/> | <br clear="all"/> | ||
= | <translate> | ||
=Overview= <!--T:1--> | |||
<!--T:2--> | |||
Unfortunately the documentation on Ralf Hoffmann's site (he is the creator of Worker, among other app's) is incomplete and parts at least are somewhat out of date. You basically work much of how Worker is configured out for yourself without having your hand held. That said, the GUI Worker Configuration Manager is pretty self explanatory. | |||
<!--T:3--> | |||
[[File: worker.configuration.main.png|centre|650px]] | |||
<!--T:4--> | |||
<br clear="all"/> | |||
The Worker Configuration screen shown above, will give you an inkling of the types of configuration options that are available inside of it. Worker is an extremely capable file manager, that may have been inspired by Jonathan Potter's brilliant Amiga file manager - Directory Opus 4.**. In many ways Worker exceeds the capabilities of DOpus, though it doesn't internally multi-task to quite the same extent that DOpus did. | |||
[ | <!--T:5--> | ||
Ralf has been developing Worker for many years now. You get an introduction to its power on [http://www.boomerangsworld.de/cms/worker/index.html this page] | |||
<!--T:6--> | |||
<br clear="all"/> | <br clear="all"/> | ||
Worker | =Installing Worker= <!--T:7--> | ||
<!--T:8--> | |||
Worker is available in the [[Arch_User_Repository|AUR]] as the package {{ic|worker}}. You can install it in your favorite graphical package manager or by using the command: | |||
pamac build worker | |||
=What can this Filemanager called Worker do?= <!--T:9--> | |||
<!--T:10--> | |||
Worker is usually installed with a pretty bare bones button setup. It is then up to the user to make Worker the way that they want Worker to be. This is done by using the Worker Configuration panel. Which is found by hitting the ''C'' - '''Configuration''' in the top left of the Worker window, it is right next to the ''A'' - '''About'''. | Worker is usually installed with a pretty bare bones button setup. It is then up to the user to make Worker the way that they want Worker to be. This is done by using the Worker Configuration panel. Which is found by hitting the ''C'' - '''Configuration''' in the top left of the Worker window, it is right next to the ''A'' - '''About'''. | ||
<!--T:11--> | |||
Worker is incredibly versatile, following is a short list of some of the things that Worker can do: | Worker is incredibly versatile, following is a short list of some of the things that Worker can do: | ||
<!--T:12--> | |||
* Has buttons that you can configure (the number of too) to run built-in commands. | * Has buttons that you can configure (the number of too) to run built-in commands. | ||
<!--T:13--> | |||
* Run external applications that you have set up to work on one or multiple files that you have selected in one of Worker's file list display. | * Run external applications that you have set up to work on one or multiple files that you have selected in one of Worker's file list display. | ||
<!--T:14--> | |||
* Worker can call applications that don't have anything to do with the files that are showing in Worker's file list displays. | * Worker can call applications that don't have anything to do with the files that are showing in Worker's file list displays. | ||
<!--T:15--> | |||
* You can run short or complex scripts that you or others have created. | * You can run short or complex scripts that you or others have created. | ||
<!--T:16--> | |||
* Combine any number of the aforementioned different types of commands to execute in sequence. | * Combine any number of the aforementioned different types of commands to execute in sequence. | ||
The above barely scratches the surface of what Worker can be configured to do. | <!--T:17--> | ||
The above barely scratches the surface of what Worker can be configured to do. It is very quick and has barely any other dependencies than X.org. | |||
<!--T:18--> | |||
Custom tasks, ranging from the very simple to the extremely complex all fall within the capacity of Worker. | Custom tasks, ranging from the very simple to the extremely complex all fall within the capacity of Worker. | ||
<!--T:19--> | |||
<br clear="all"/> | <br clear="all"/> | ||
=Select your Colours, Fonts= | =Select your Colours, Fonts= <!--T:20--> | ||
<!--T:21--> | |||
A good number of screenshots of Worker can be found here: [http://www.boomerangsworld.de/cms/worker/screenshots.html] | A good number of screenshots of Worker can be found here: [http://www.boomerangsworld.de/cms/worker/screenshots.html] | ||
As informative as the screenshots shown at the above link are, they don't show you what can be done colour wise with Worker. Using various colours to suit your eyes/taste & to make Worker more easily used & more practical, as you can use certain colours to good effect (especially where there is danger, as in the case of commands such as DELETE , Reboot , Shutdown & any buttons that you have set up to use | <!--T:22--> | ||
As informative as the screenshots shown at the above link are, they don't show you what can be done colour wise with Worker. Using various colours to suit your eyes/taste & to make Worker more easily used & more practical, as you can use certain colours to good effect (especially where there is danger, as in the case of commands such as DELETE , Reboot , Shutdown & any buttons that you have set up to use sudo or root privileges one way or another. The first screenshot on this page is a reasonably good example of the use of colours in this way. | |||
<!--T:23--> | |||
Apart from being able to select the main interface colours as shown in the following image, you can also set the number of colours to be used & also modify the colours to suit you. | Apart from being able to select the main interface colours as shown in the following image, you can also set the number of colours to be used & also modify the colours to suit you. | ||
<!--T:24--> | |||
<br clear="all"/> | <br clear="all"/> | ||
[[File:worker.user.interface.colours.png|centre|650px]] | [[File:worker.user.interface.colours.png|centre|650px]] | ||
<!--T:25--> | |||
<br clear="all"/> | <br clear="all"/> | ||
When you set Worker up, you can select the font & font size that you would like to use. Choosing fonts | When you set Worker up, you can select the font & font size that you would like to use. Choosing fonts seems to be the most pre-historic part of Worker, though as of this edit, the choice of font is now much better than it was. Fortunately if you do need/want to do it, after you have done it once, there isn't much to do when it comes to resizing fonts thereafter. See this page of the Worker documentation for more on the subject of choosing sizing Worker's fonts: [http://www.boomerangsworld.de/cms/worker/documentation/features/fonts.html] | ||
<!--T:26--> | |||
<br clear="all"/> | <br clear="all"/> | ||
[[File:worker.font.settings2.png|centre|650px]] | [[File:worker.font.settings2.png|centre|650px]] | ||
<!--T:27--> | |||
<br clear="all"/> | <br clear="all"/> | ||
=Paths & Bookmarked locations= <!--T:28--> | |||
<!--T:29--> | |||
You can setup custom Path buttons (the Path bank of buttons is the left hand column in the main button bank) you can have as many '''path button banks''' as you want, you cycle through these banks by using the right mouse button (RMB). | You can setup custom Path buttons (the Path bank of buttons is the left hand column in the main button bank) you can have as many '''path button banks''' as you want, you cycle through these banks by using the right mouse button (RMB). | ||
<!--T:30--> | |||
<br clear="all"/> | <br clear="all"/> | ||
[[File:worker.path.button.bank.config.png|centre|650px]] | [[File:worker.path.button.bank.config.png|centre|650px]] | ||
<!--T:31--> | |||
<br clear="all"/> | <br clear="all"/> | ||
Whilst we are on the Path subject, I should mention that you can also use bookmarks to bounce between oft used locations (paths) in your system. The tabs go across the top of each file list window, you move to a list of files in a different part of your system by hitting the tab that will show that list with your mouse pointer & the left mouse button (LMB). | Whilst we are on the Path subject, I should mention that you can also use bookmarks to bounce between oft used locations (paths) in your system. The tabs go across the top of each file list window, you move to a list of files in a different part of your system by hitting the tab that will show that list with your mouse pointer & the left mouse button (LMB). | ||
<!--T:32--> | |||
<br clear="all"/> | <br clear="all"/> | ||
=Custom Button Configuration= <!--T:33--> | |||
You also can set up the Worker command button bank(s) to suit you. Choose how many rows of them | <!--T:34--> | ||
You also can set up the Worker command button bank(s) to suit you. Choose how many rows of them and how many banks (each bank will have the same number of buttons) as well. You cycle to the next main button bank by hitting the bottom bar in the Worker window - it holds the date/time, free RAM, swap usage - though this is somewhat configurable too. | |||
<!--T:35--> | |||
<br clear="all"/> | <br clear="all"/> | ||
[[File:worker.button.panel.config.png|centre|650px]] | [[File:worker.button.panel.config.png|centre|650px]] | ||
<!--T:36--> | |||
<br clear="all"/> | <br clear="all"/> | ||
<!--T:37--> | |||
It is possible to use the buttons that came as part of the initial Worker install, though it is more common to edit your config to suit your needs. When you see a button in a screenshot that has a "dog eared" top right corner, that means that if you use your RMB on it, you will have access to another button option that is hiding underneath. (You could for example have the top button saying '''Edit''' for editing existing files, & the button accessed via the RMB, underneath, saying '''Edit New''' for creating new files.) | |||
<!--T:38--> | |||
<br clear="all"/> | <br clear="all"/> | ||
[[File:worker.configure.button.own.command.png|centre|650px]] | [[File:worker.configure.button.own.command.png|centre|650px]] | ||
<!--T:39--> | |||
<br clear="all"/> | <br clear="all"/> | ||
<!--T:40--> | |||
<br clear="all"/> | <br clear="all"/> | ||
[[File:worker.configure.button.own.command.Options.png|centre|650px]] | [[File:worker.configure.button.own.command.Options.png|centre|650px]] | ||
<!--T:41--> | |||
<br clear="all"/> | <br clear="all"/> | ||
==Use external applications on files== | ==Use external applications on files== <!--T:42--> | ||
Even though Worker comes with inbuilt text & image viewing abilities, | <!--T:43--> | ||
Even though Worker comes with inbuilt text & image viewing abilities, you can also set Worker up to use more powerful external programs. For exmaple, you could use Geegie to view images. By associating Geegie with the various types of image file types available (using the Worker Configuration GUI), when you double click on an image file in the Worker display, Geegie displays it(you could set different image types to be opened by different image viewing or editing programs if you had the need). | |||
<!--T:44--> | |||
<br clear="all"/> | <br clear="all"/> | ||
[[File:worker.file.type.config.png|centre|650px]] | [[File:worker.file.type.config.png|centre|650px]] | ||
<!--T:45--> | |||
<br clear="all"/> | <br clear="all"/> | ||
You can then view all of the images in that directory by scrolling the mouse wheel, or tell Geegie to go full screen and play a slide show of the images, or do whatever else Geegie will allow you to do with any of the images in that directory. | |||
If | <!--T:46--> | ||
If you '''R'''MB click on the '''F3 - Show Pics''' button (yes you can easily set up function keys too), you will see, '''Edit Pics''' (the RMB buttons are all in different colours than the top LMB accessed buttons). If you have an image file highlighted in Worker, then your editor of choice will open up with the highlighted file ready to edit. | |||
<!--T:47--> | |||
This can be done for any type of file on your system that you have a program that you want to use to edit/view it. The '''File Type''' list included in the Worker Configuration GUI (the list is part shown in an the preceding image) is huge, very highly configurable (something like fourteen different custom user options can be set up) plus you can add custom file types quite easily. | This can be done for any type of file on your system that you have a program that you want to use to edit/view it. The '''File Type''' list included in the Worker Configuration GUI (the list is part shown in an the preceding image) is huge, very highly configurable (something like fourteen different custom user options can be set up) plus you can add custom file types quite easily. | ||
For example, | <!--T:48--> | ||
For example, you could use Evince for .pdf files, Firefox for .html files and Leafpad for .txt files. It is possible to setup sudo Leafpad buttons for both creating '''New''' files & of course to work on existing files. So you can select a config file in the {{ic|/etc}} and then use the Worker '''sudo Leafpad''' button on it, which will cause Worker to throw up a terminal window where you have to input your sudo password, then the config file from /etc will be showing in Leafpad & available for me to edit & then save the changes. | |||
You can of course use the buttons to call programs that have nothing to do with any of the files in your Worker display. You can run scripts, simple or complex from a button, as normal user or with root privileges, you can combine applications & scripts & most anything else you can come up with to work in sequence. It is up to your imagination | <!--T:49--> | ||
You can of course use the buttons to call programs that have nothing to do with any of the files in your Worker display. You can run scripts, simple or complex from a button, as normal user or with root privileges, you can combine applications & scripts & most anything else you can come up with to work in sequence. It is up to your imagination to do what you want to do with Worker. | |||
<!--T:50--> | |||
<br clear="all"/> | <br clear="all"/> | ||
=Worker is built for those that like to customise= | =Worker is built for those that like to customise= <!--T:51--> | ||
<!--T:52--> | |||
This is a part of what I really love about Worker. You can make Worker do what you want it to do & not have to put up with having to do things the way someone else wants you to do it. | This is a part of what I really love about Worker. You can make Worker do what you want it to do & not have to put up with having to do things the way someone else wants you to do it. | ||
<!--T:53--> | |||
This is all fine & good, unless you are someone who loves working with windows & icons. Under those circumstances you would find Worker to be just exactly what you don't want (you may even think that Worker is pre-historic!). | This is all fine & good, unless you are someone who loves working with windows & icons. Under those circumstances you would find Worker to be just exactly what you don't want (you may even think that Worker is pre-historic!). | ||
<!--T:54--> | |||
<br clear="all"/> | |||
==Backup your worker config & use it elsewhere== <!--T:55--> | |||
==Backup your | |||
You can save your custom ~/.worker/config file ''(it is a '''REALLY''' good idea to keep a backup of this file)''. Apart from saving your configuration from being lost to corruption or whatever, you can transfer your ~/.worker/config file to other installations of Linux | <!--T:56--> | ||
You can save your custom {{ic|~/.worker/config}} file ''(it is a '''REALLY''' good idea to keep a backup of this file)''. Apart from saving your configuration from being lost to corruption or whatever, you can transfer your {{ic|~/.worker/config}} file to other installations of Linux. You can also edit the {{ic|~/.worker/config}} file directly with a text editor, which can be useful sometimes. | |||
<!--T:57--> | |||
<br clear="all"/> | <br clear="all"/> | ||
==Edit the worker config file directly== <!--T:58--> | |||
<!--T:59--> | |||
For example, if you transfer worker config file to another system that is using a lower resolution monitor, when you then run Worker with your transferred custom config on that machine, the display will be very wrong making Worker pretty unusable. You may not be access the GUI config to modify the font size, as the large fonts have made it impossible to do so (can't see/access all the necessary parts of the Worker Configuration GUI). | |||
<!--T:60--> | |||
So you can directly edit the {{ic|~/.worker/config}} file with a text editor, scroll down to the font section & change the sizes. Save it, restart Worker, go into the Worker Configuration GUI and adjust/fine tune the config to suit the new machine. | |||
fonts { | <!--T:61--> | ||
If you ever strike this problem, this is the part of the {{ic|~/.worker/config}} file you need to edit. | |||
<!--T:62--> | |||
fonts { | |||
globalfont = "-*-verdana-bold-r-normal-*-14-*-*-*-*-*-*-*"; | globalfont = "-*-verdana-bold-r-normal-*-14-*-*-*-*-*-*-*"; | ||
buttonfont = "-*-verdana-bold-r-normal-*-14-*-*-*-*-*-*-*"; | buttonfont = "-*-verdana-bold-r-normal-*-14-*-*-*-*-*-*-*"; | ||
| Line 151: | Line 208: | ||
} | } | ||
By looking at the above you can see that it is the '''xfgfonts''' section that is where the large 18 -> 24 size fonts are, so you just make all those numbers suitably smaller | <!--T:63--> | ||
By looking at the above you can see that it is the '''xfgfonts''' section that is where the large 18 -> 24 size fonts are, so you just make all those numbers suitably smaller, then you can use the Worker Configuration GUI to fine tune your imported settings to suit the new machine. | |||
<!--T:64--> | |||
<br clear="all"/> | |||
=Making Worker work how you want it to= | =Making Worker work how you want it to= <!--T:65--> | ||
<!--T:66--> | |||
The above will hopefully give you more of an idea about how Worker functions, you have to make Worker your own, this doesn't happen quickly, but it does get easier once you have understood the basics. You really have to get into the Worker Configuration GUI & have a look around to start to get familiar with it. | The above will hopefully give you more of an idea about how Worker functions, you have to make Worker your own, this doesn't happen quickly, but it does get easier once you have understood the basics. You really have to get into the Worker Configuration GUI & have a look around to start to get familiar with it. | ||
<!--T:67--> | |||
For setting up buttons, look at how other buttons are setup, you will start to see that there are certain options that are native to Worker (like the '''{f}''' in the coming example) that are commonly used when you want to open a file that you have highlighted in the Worker display. The following example (is much clearer & simpler than it looks here, when you are actually looking at it in Worker running on your own system). | For setting up buttons, look at how other buttons are setup, you will start to see that there are certain options that are native to Worker (like the '''{f}''' in the coming example) that are commonly used when you want to open a file that you have highlighted in the Worker display. The following example (is much clearer & simpler than it looks here, when you are actually looking at it in Worker running on your own system). | ||
<!--T:68--> | |||
<br clear="all"/> | <br clear="all"/> | ||
==Options, Options...== <!--T:69--> | |||
<!--T:70--> | |||
[[File:worker.button.config.Option.flags.png|centre|650px]] | |||
< | <!--T:71--> | ||
There are currently 47 Option flags that can be seen when you hit the '''O''' at the end of the '''program:''' field, where you enter in your own command as seen in the above two examples, it is right before '''leafpad''' . | |||
<!--T:72--> | |||
Of those 47 Options, you probably won't to need to use all of them. When you look at what the options can do, you will see that you can get very sophisticated but it isn't a requirement. | |||
<!--T:73--> | |||
The previous image shows some of those 47 Option flags in the window on the right hand side of the image. | |||
<!--T:74--> | |||
<br clear="all"/> | <br clear="all"/> | ||
==Built-in Commands== <!--T:75--> | |||
<!--T:76--> | |||
Worker currently also has 61 commands built into it. They are listed when you wish to create a new button (and choose the '''Add Command''' button. The following screenshot shows some of those 61 commands. | |||
<!--T:77--> | |||
<br clear="all"/> | <br clear="all"/> | ||
[[File:worker.built.in.commands.png|centre|650px]] | |||
= | <!--T:78--> | ||
<br clear="all"/> | |||
==Sequencing Commands== <!--T:79--> | |||
<!--T:80--> | |||
You can also have more than one command listed in sequence. Meaning that when setting up a button to do what you want, after the creation of a command, instead of OK'ing out of that window, you can add another command. You can continue to repeat this as desired. | |||
<!--T:81--> | |||
The above image already has a command (it uses Geegie to show an image that has been selected in one of Worker's file lists), you can add more commands if you need to sequence them for some reason. The commands can be any mixture of both built-in commands and external programs. | |||
<!--T:82--> | |||
<br clear="all"/> | <br clear="all"/> | ||
==Summary== | ==Summary== <!--T:83--> | ||
<!--T:84--> | |||
The Worker filemanager is certainly not one that everyone would want to set up & use. Though for those of us that it does suit, the more we use it, the more we get to know Worker, the more we configure it to be just the way we want it to be. | |||
<!--T:85--> | |||
It is very easy to change the applications that we call from inside of Worker, that we use to work on whatever kind of files in whichever way we have chosen. Worker doesn't mind, that is what it is made for (well, a part of what it is made for). | |||
<!--T:86--> | |||
<br clear="all"/> | <br clear="all"/> | ||
= | =See Also= <!--T:87--> | ||
<!--T:88--> | |||
You can post any related feedback in the related [https://forum.manjaro.org/t/wiki-worker-an-introduction-to-the-highly-configurable-file-manager/17667 Forum Topic] | |||
</translate> | |||
[[Category:Contents Page]] | [[Category:Contents Page{{#translation:}}]] | ||
Latest revision as of 07:45, 18 January 2023
Overview
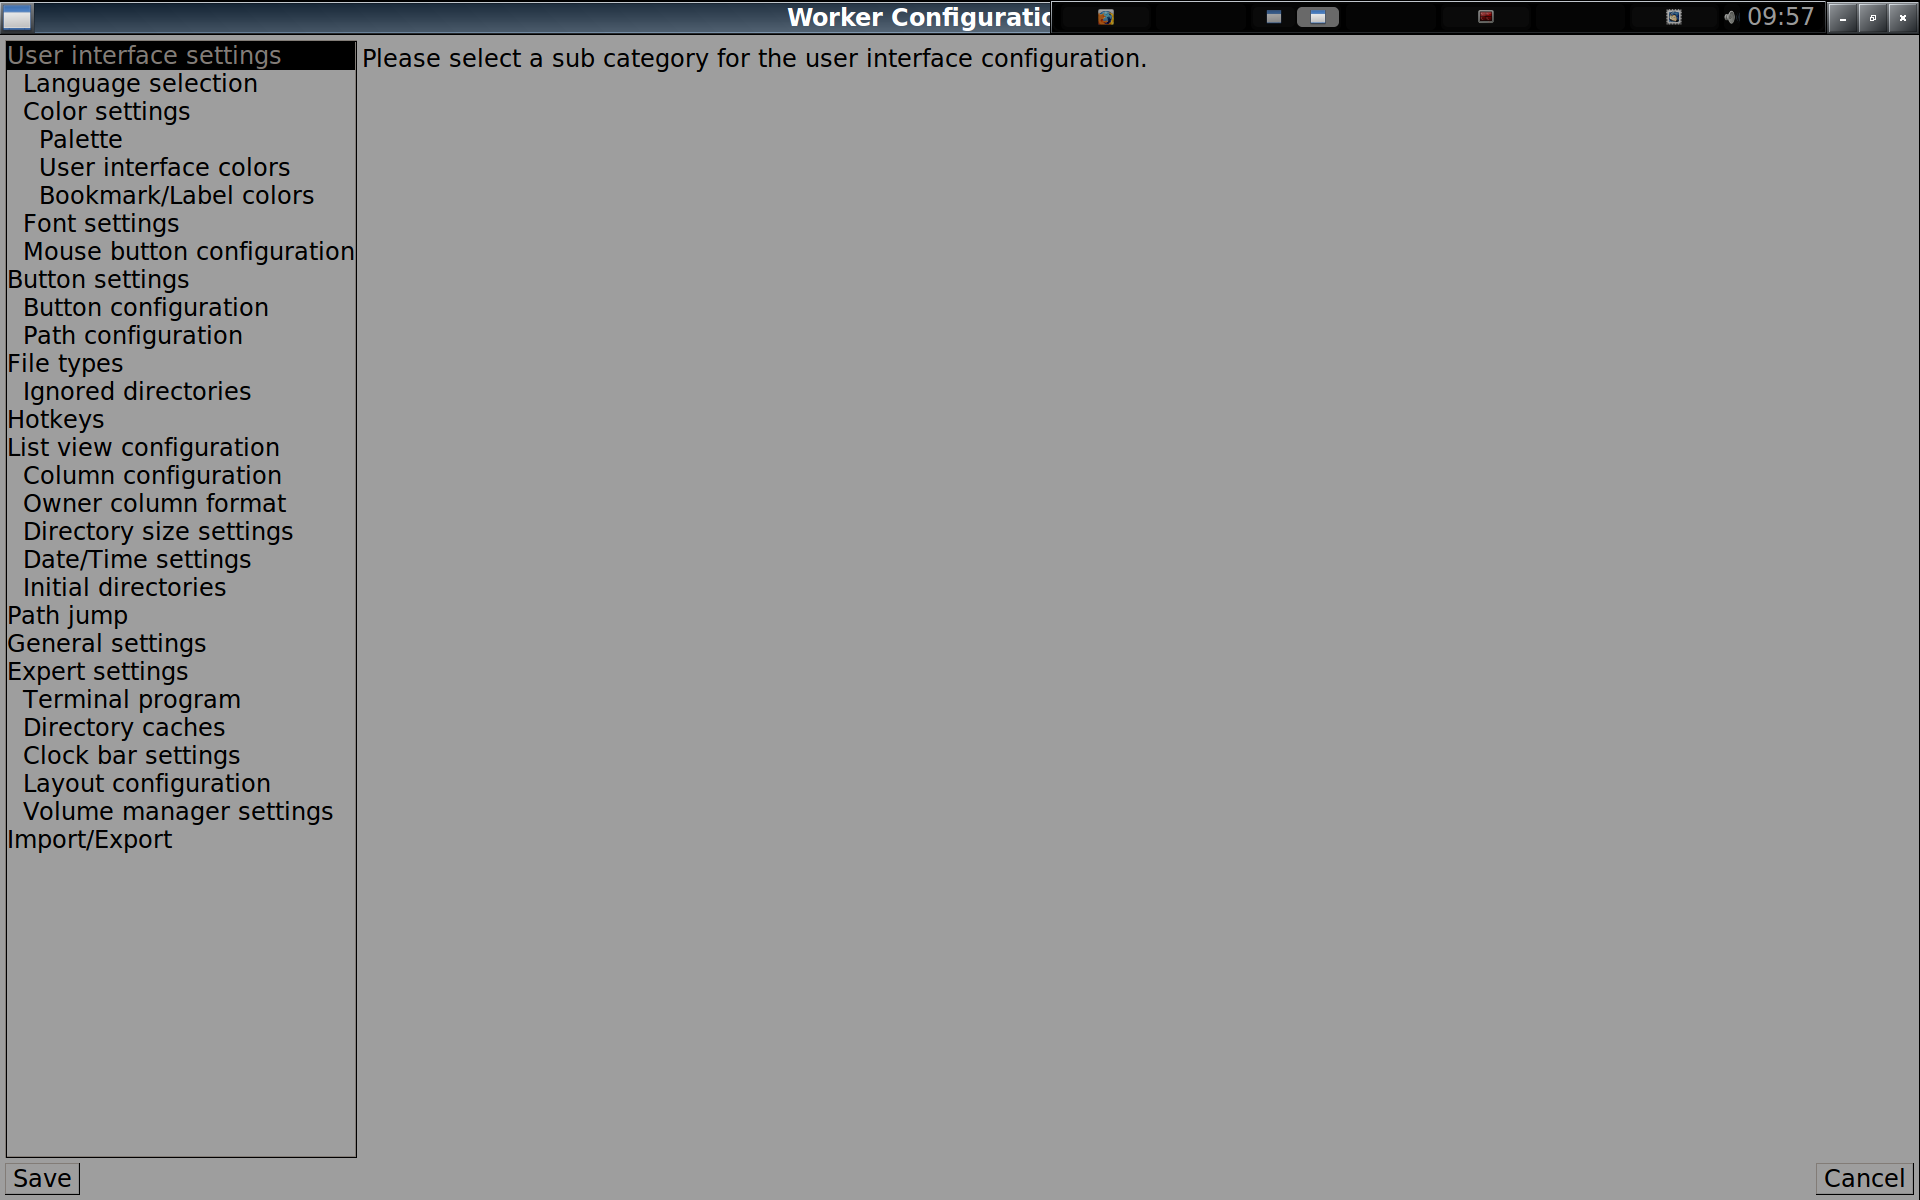
Unfortunately the documentation on Ralf Hoffmann's site (he is the creator of Worker, among other app's) is incomplete and parts at least are somewhat out of date. You basically work much of how Worker is configured out for yourself without having your hand held. That said, the GUI Worker Configuration Manager is pretty self explanatory.
The Worker Configuration screen shown above, will give you an inkling of the types of configuration options that are available inside of it. Worker is an extremely capable file manager, that may have been inspired by Jonathan Potter's brilliant Amiga file manager - Directory Opus 4.**. In many ways Worker exceeds the capabilities of DOpus, though it doesn't internally multi-task to quite the same extent that DOpus did.
Ralf has been developing Worker for many years now. You get an introduction to its power on this page
Installing Worker
Worker is available in the AUR as the package worker. You can install it in your favorite graphical package manager or by using the command:
pamac build worker
What can this Filemanager called Worker do?
Worker is usually installed with a pretty bare bones button setup. It is then up to the user to make Worker the way that they want Worker to be. This is done by using the Worker Configuration panel. Which is found by hitting the C - Configuration in the top left of the Worker window, it is right next to the A - About.
Worker is incredibly versatile, following is a short list of some of the things that Worker can do:
- Has buttons that you can configure (the number of too) to run built-in commands.
- Run external applications that you have set up to work on one or multiple files that you have selected in one of Worker's file list display.
- Worker can call applications that don't have anything to do with the files that are showing in Worker's file list displays.
- You can run short or complex scripts that you or others have created.
- Combine any number of the aforementioned different types of commands to execute in sequence.
The above barely scratches the surface of what Worker can be configured to do. It is very quick and has barely any other dependencies than X.org.
Custom tasks, ranging from the very simple to the extremely complex all fall within the capacity of Worker.
Select your Colours, Fonts
A good number of screenshots of Worker can be found here: [1]
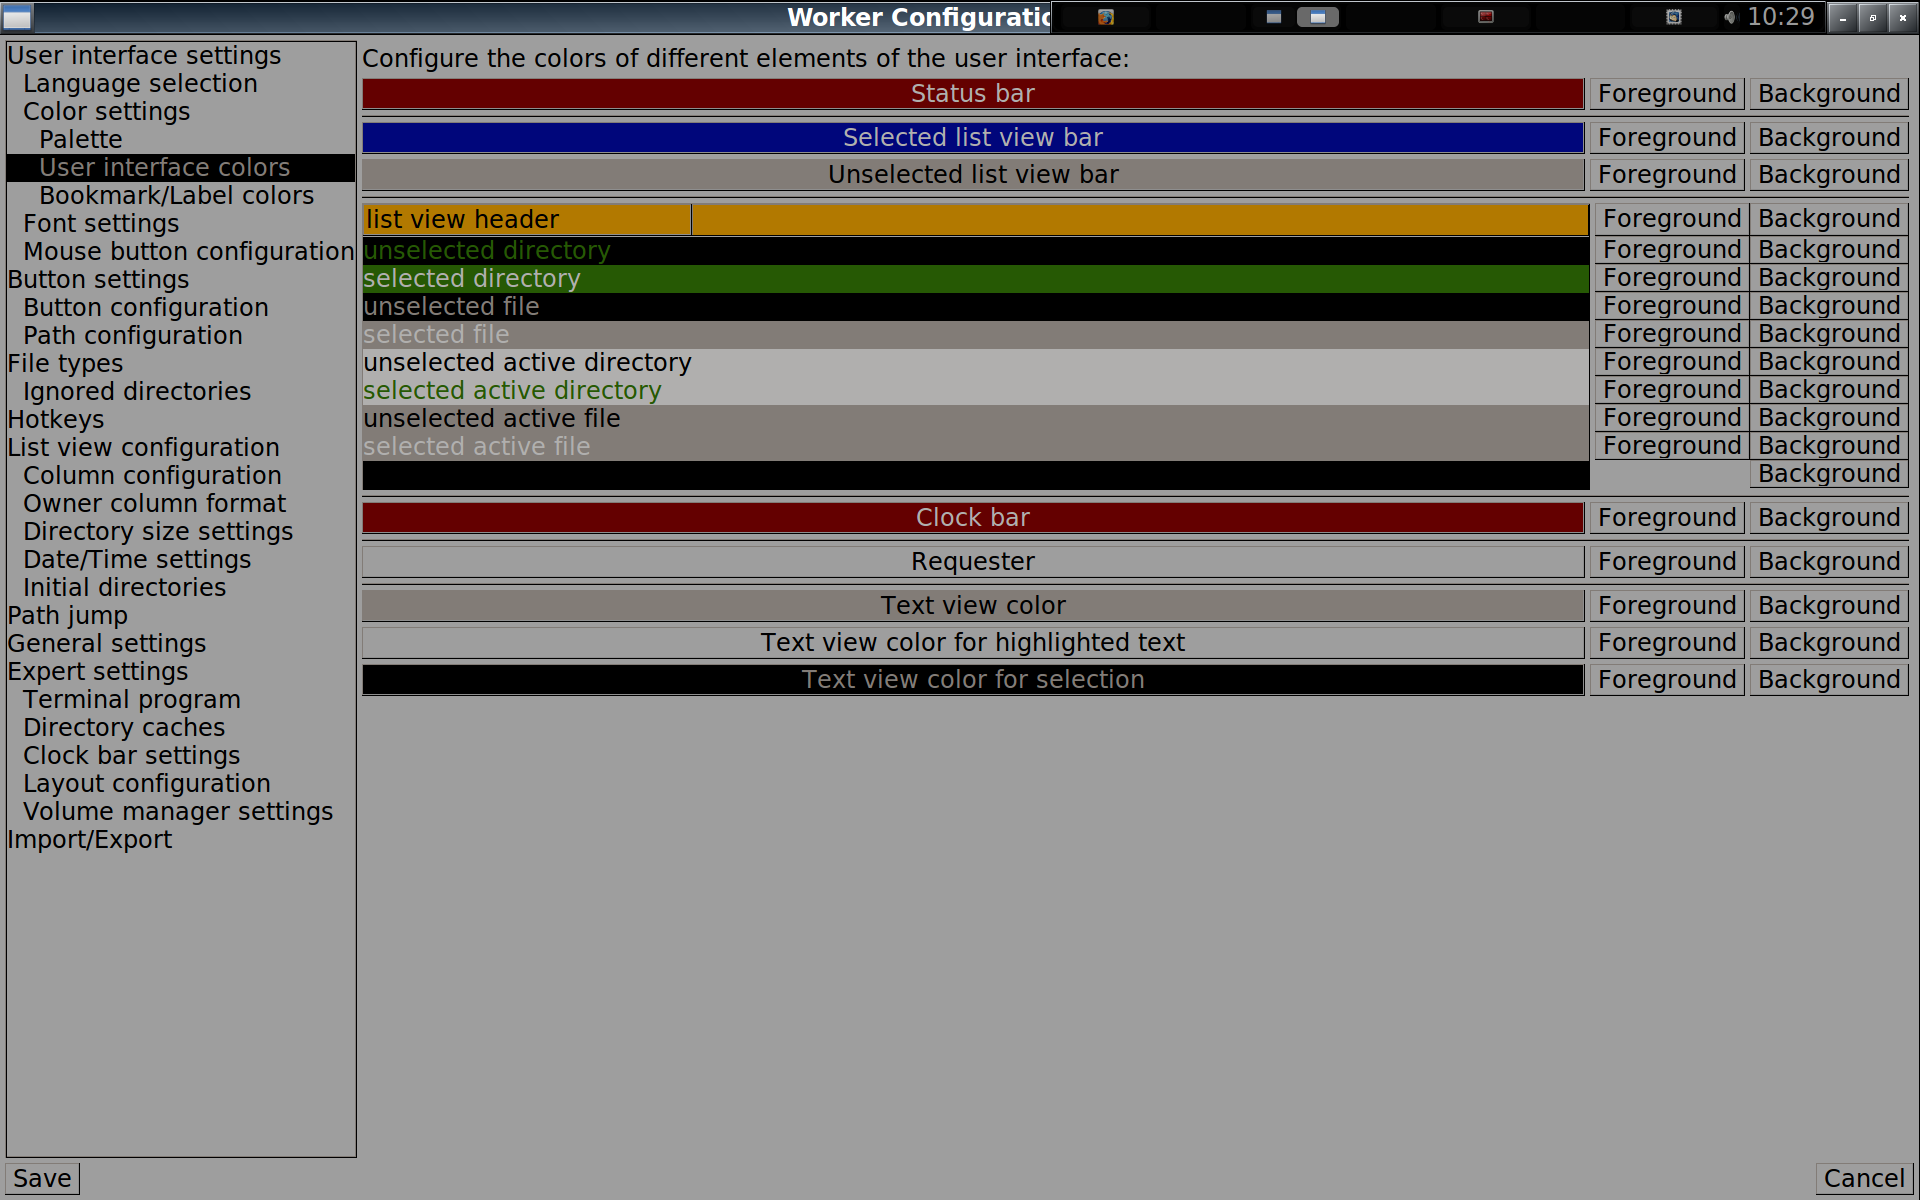
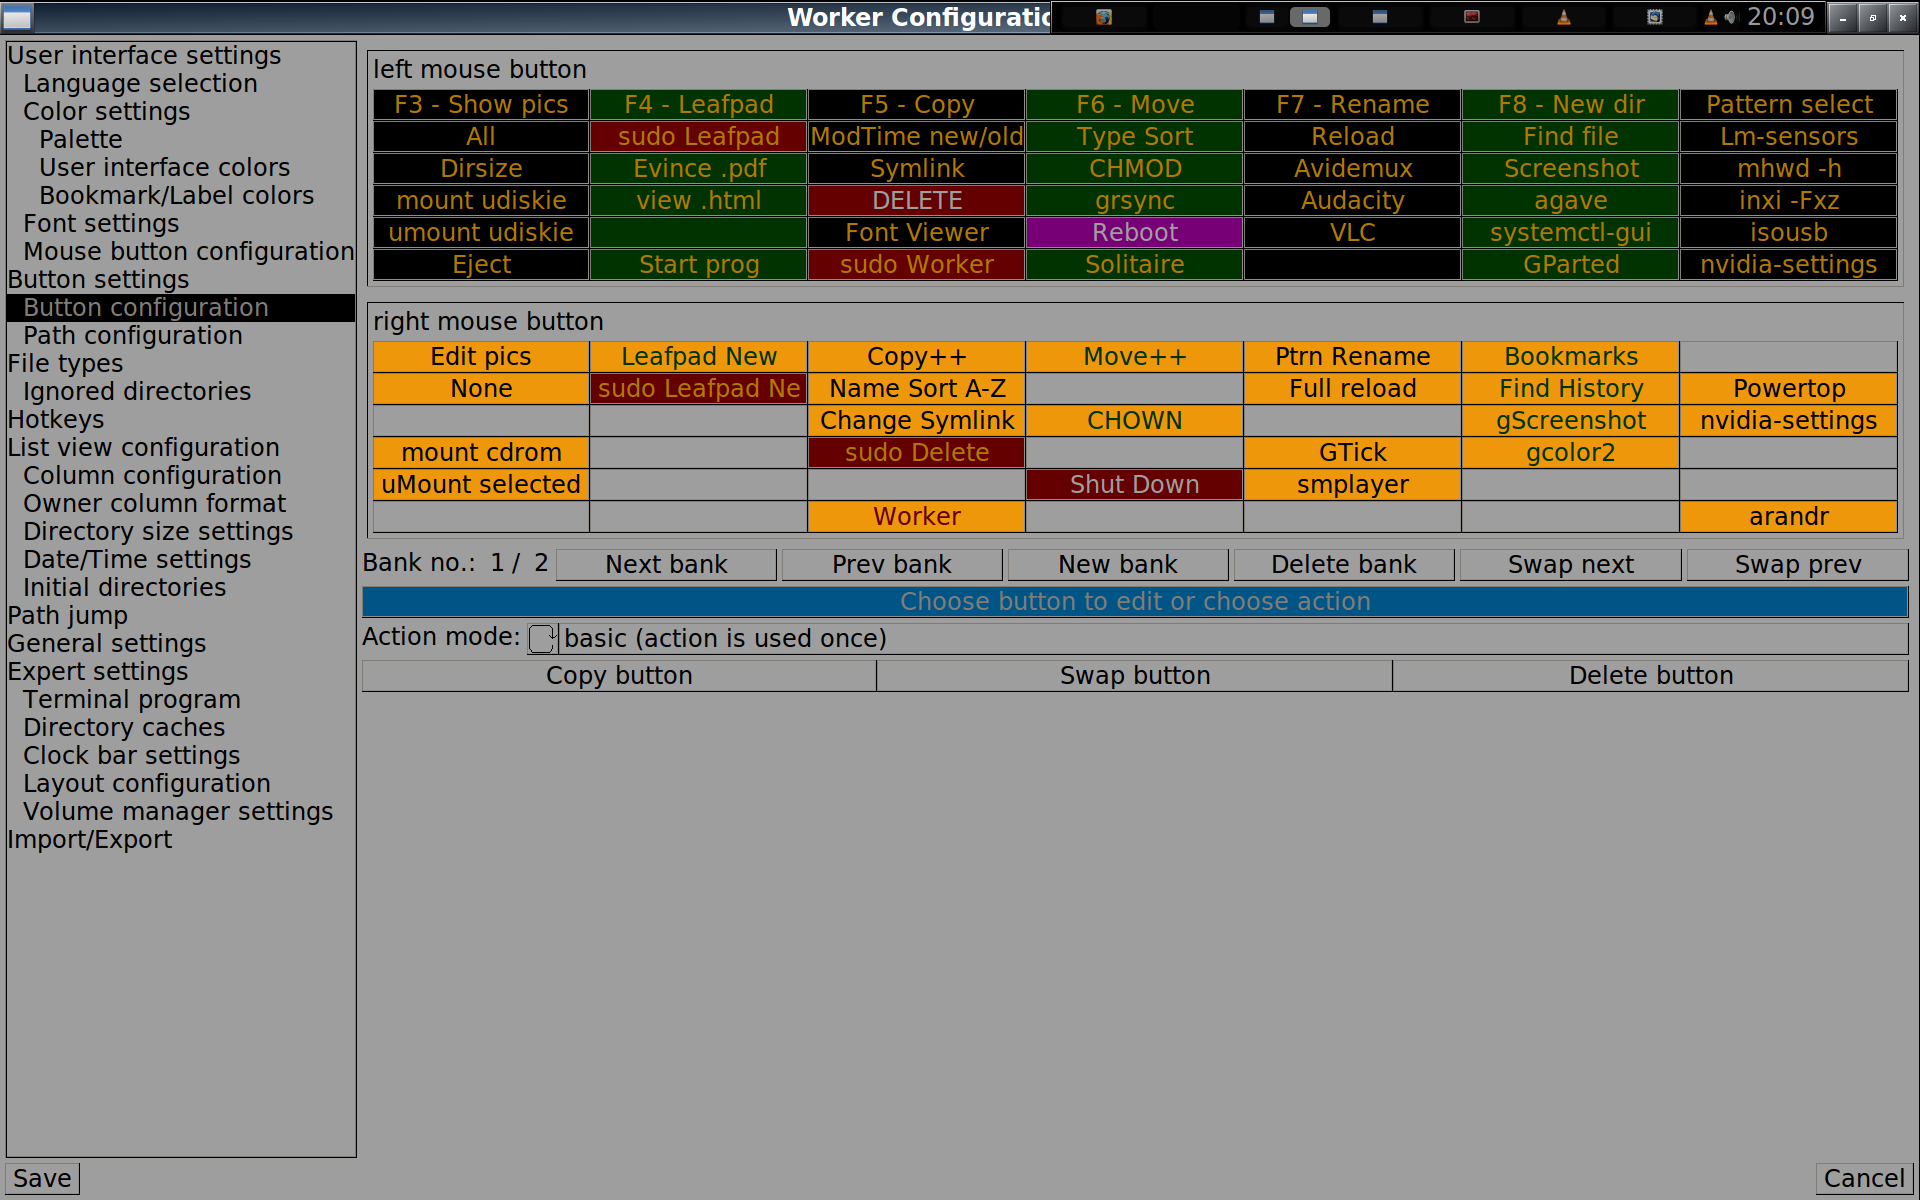
As informative as the screenshots shown at the above link are, they don't show you what can be done colour wise with Worker. Using various colours to suit your eyes/taste & to make Worker more easily used & more practical, as you can use certain colours to good effect (especially where there is danger, as in the case of commands such as DELETE , Reboot , Shutdown & any buttons that you have set up to use sudo or root privileges one way or another. The first screenshot on this page is a reasonably good example of the use of colours in this way.
Apart from being able to select the main interface colours as shown in the following image, you can also set the number of colours to be used & also modify the colours to suit you.
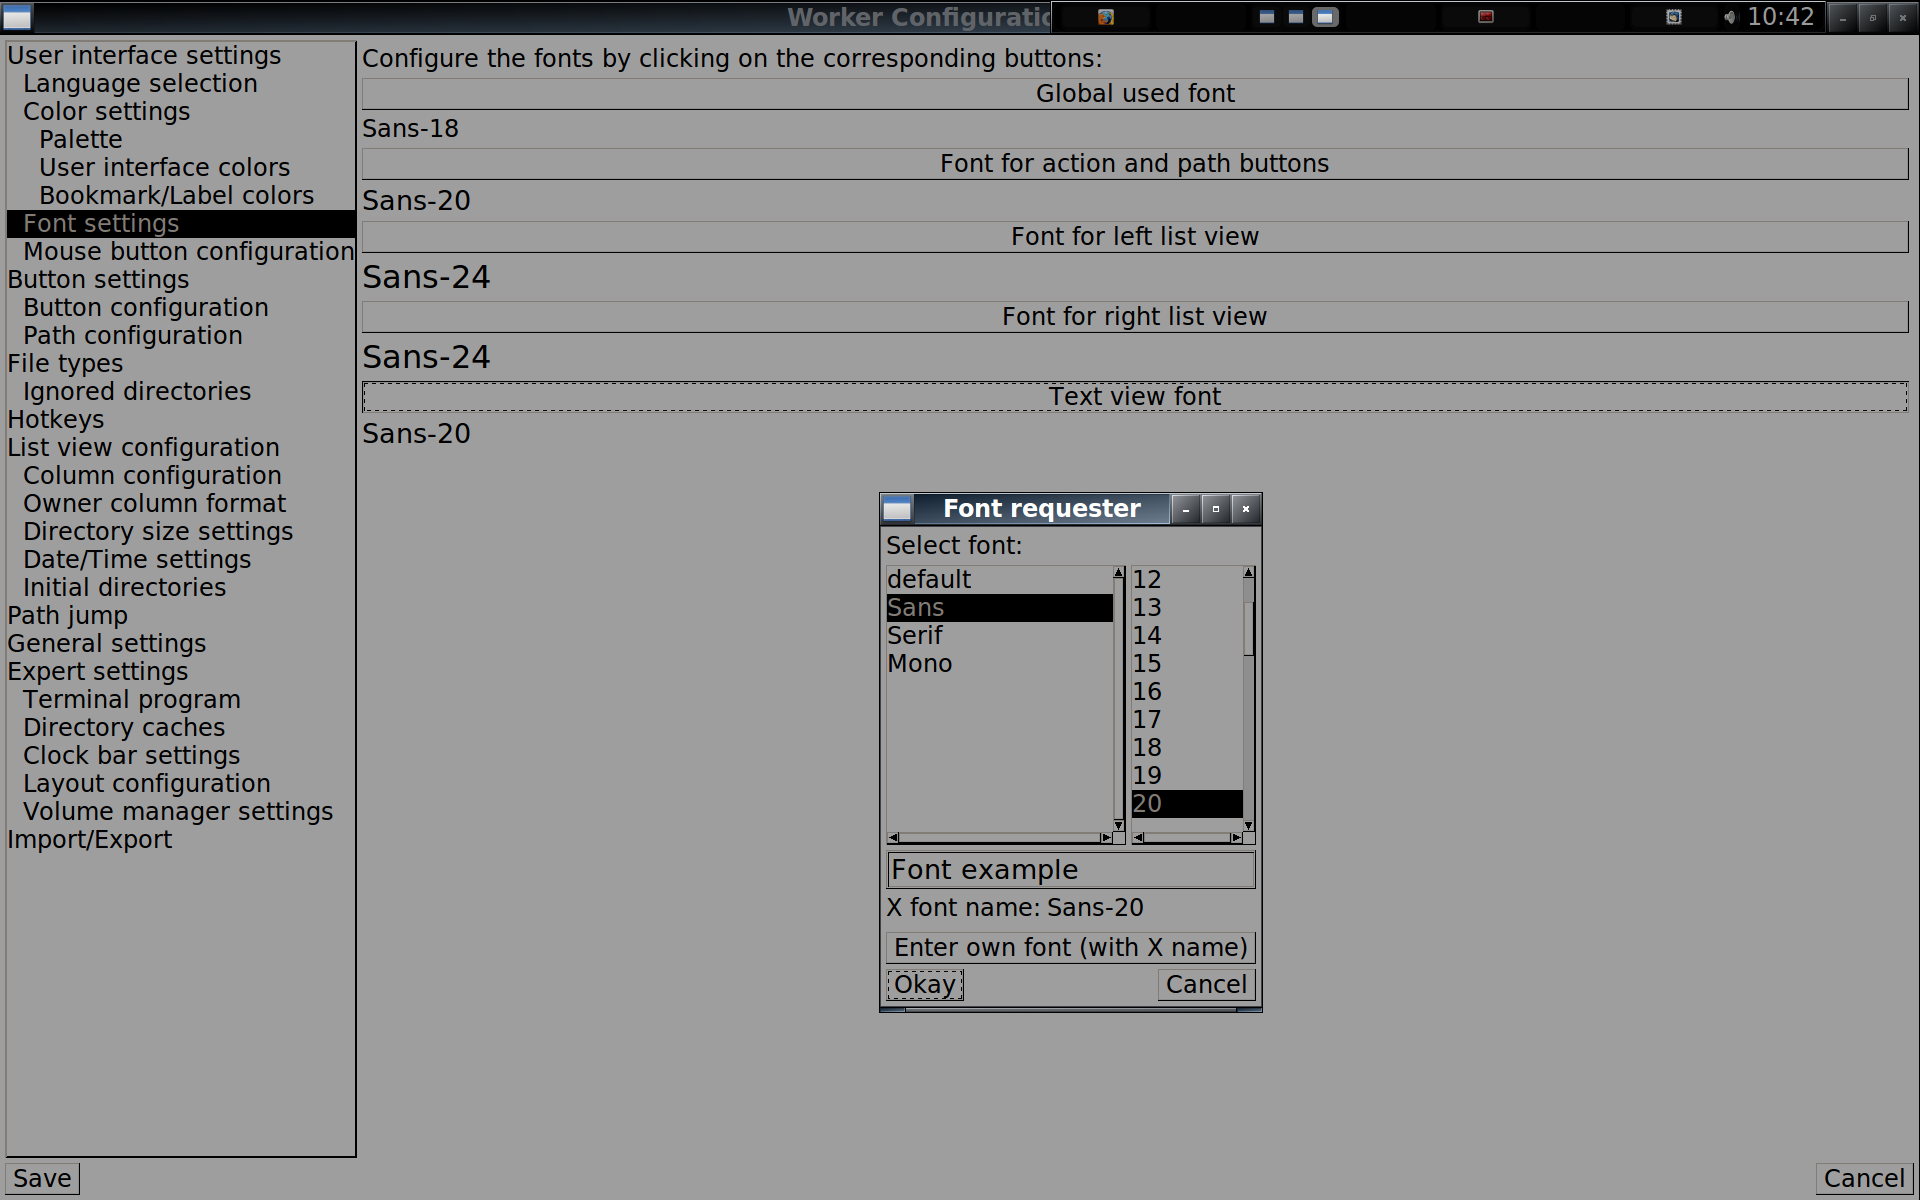
When you set Worker up, you can select the font & font size that you would like to use. Choosing fonts seems to be the most pre-historic part of Worker, though as of this edit, the choice of font is now much better than it was. Fortunately if you do need/want to do it, after you have done it once, there isn't much to do when it comes to resizing fonts thereafter. See this page of the Worker documentation for more on the subject of choosing sizing Worker's fonts: [2]
Paths & Bookmarked locations
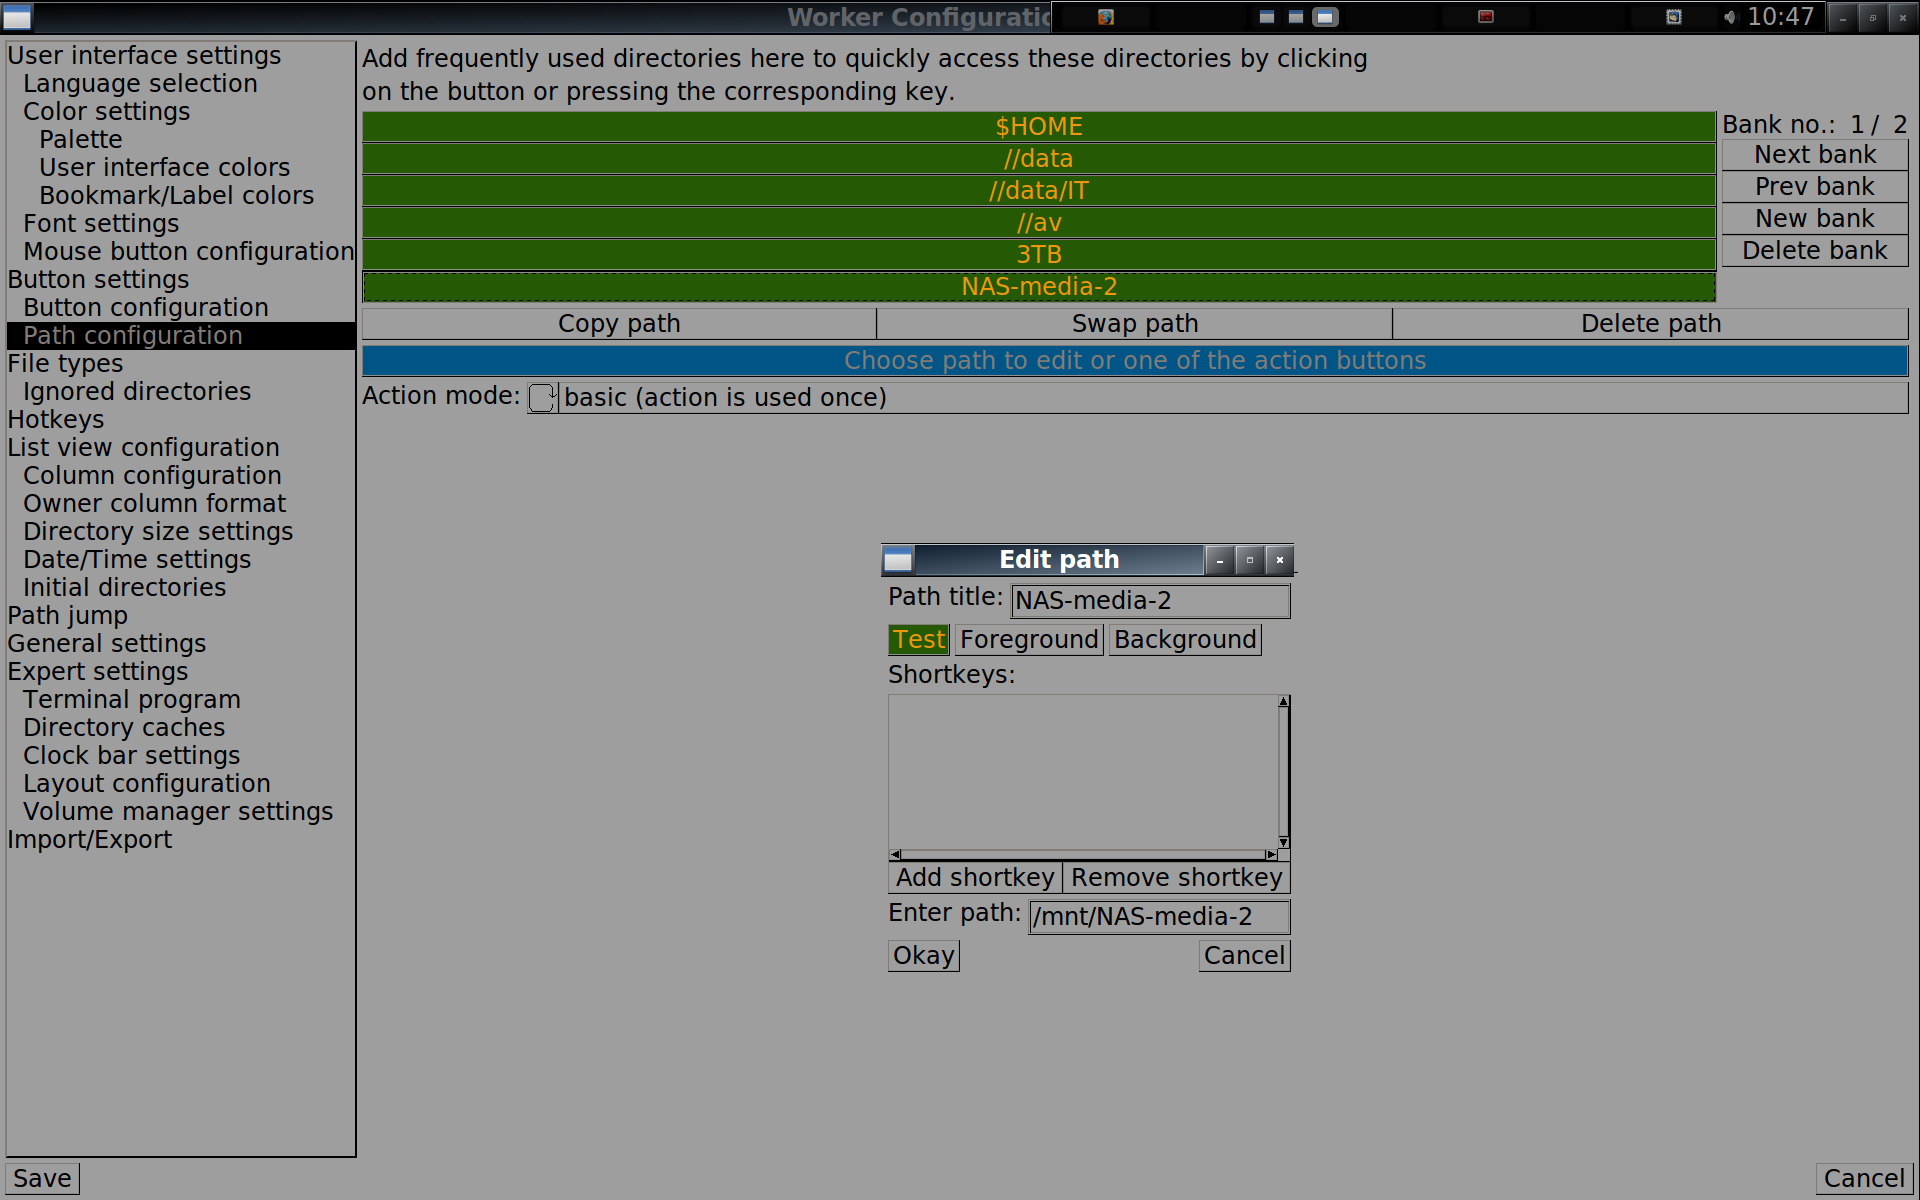
You can setup custom Path buttons (the Path bank of buttons is the left hand column in the main button bank) you can have as many path button banks as you want, you cycle through these banks by using the right mouse button (RMB).
Whilst we are on the Path subject, I should mention that you can also use bookmarks to bounce between oft used locations (paths) in your system. The tabs go across the top of each file list window, you move to a list of files in a different part of your system by hitting the tab that will show that list with your mouse pointer & the left mouse button (LMB).
Custom Button Configuration
You also can set up the Worker command button bank(s) to suit you. Choose how many rows of them and how many banks (each bank will have the same number of buttons) as well. You cycle to the next main button bank by hitting the bottom bar in the Worker window - it holds the date/time, free RAM, swap usage - though this is somewhat configurable too.
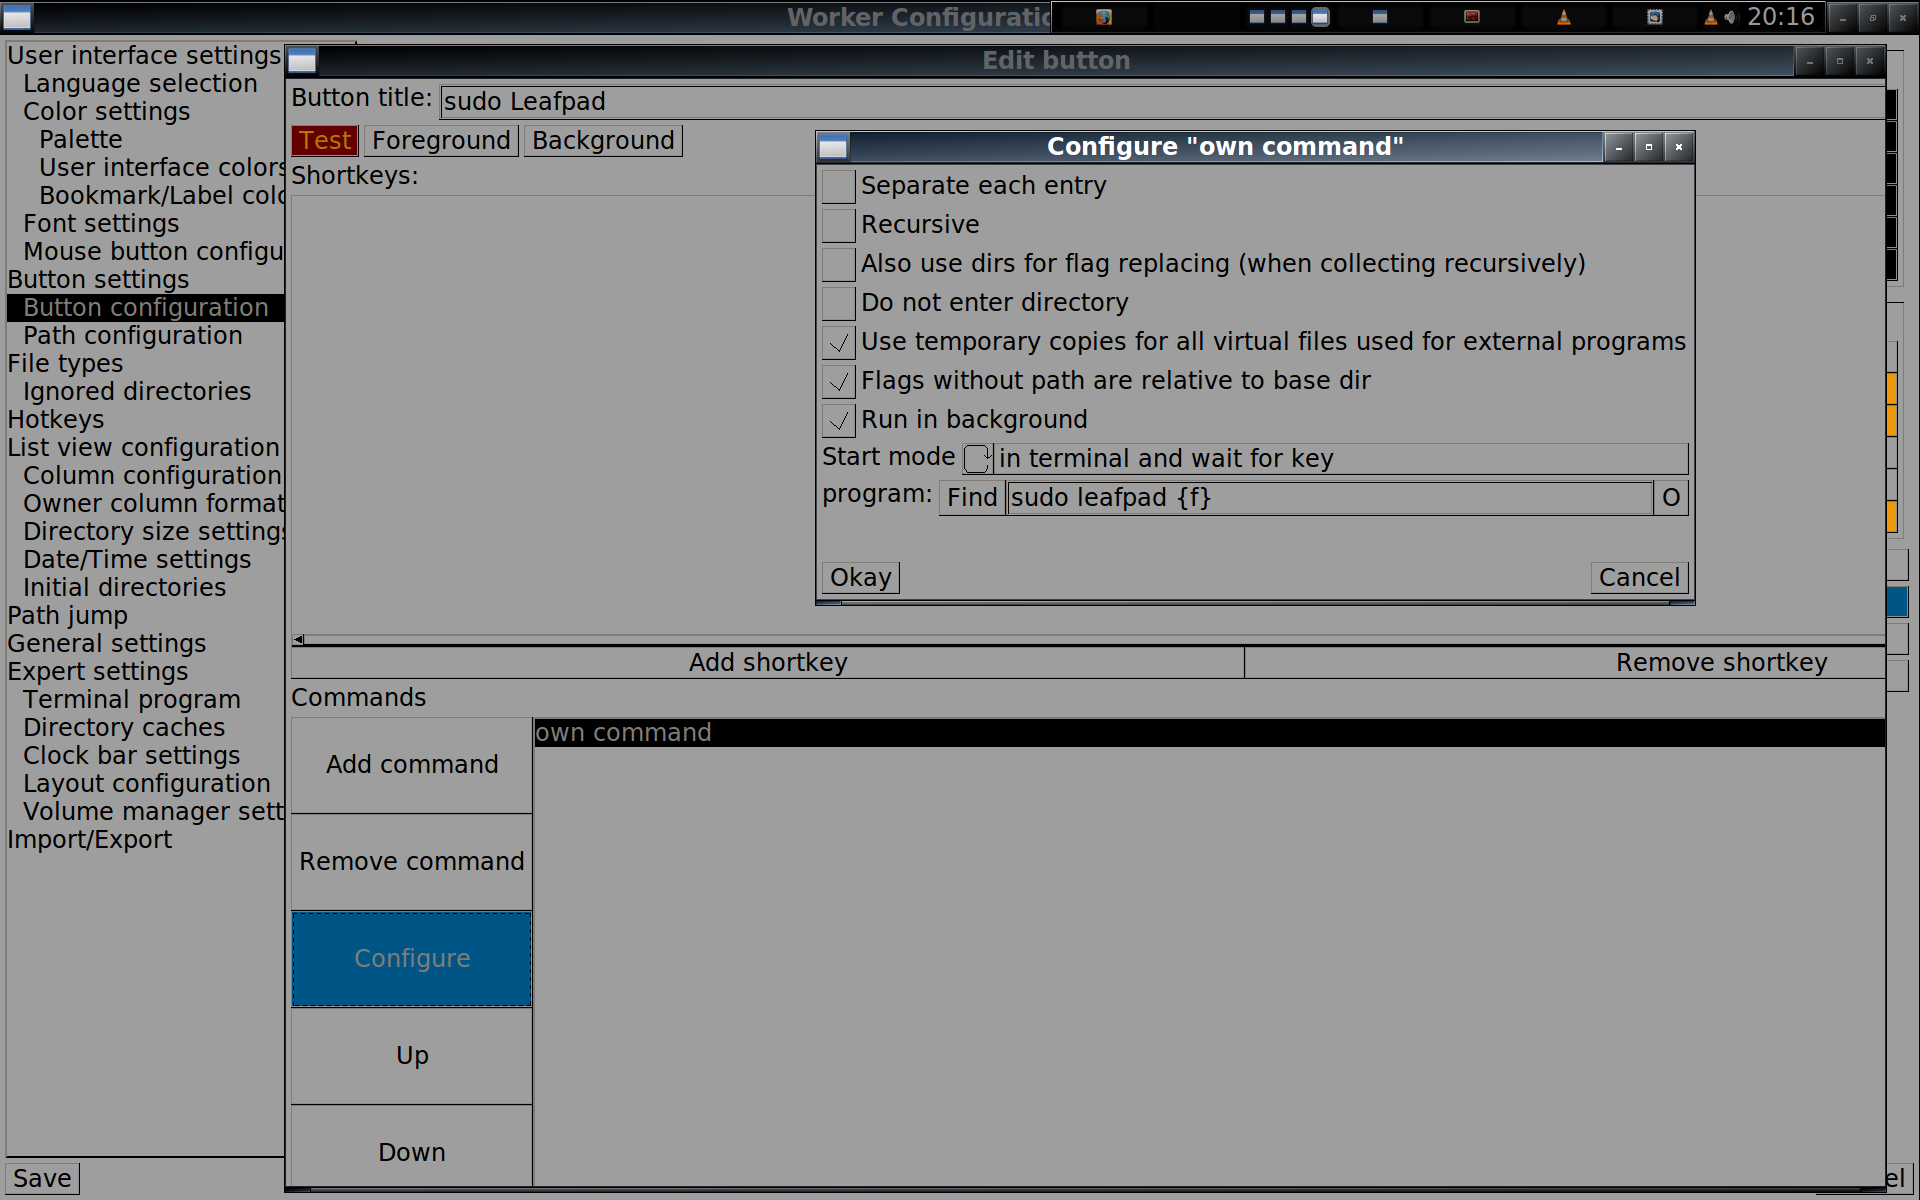
It is possible to use the buttons that came as part of the initial Worker install, though it is more common to edit your config to suit your needs. When you see a button in a screenshot that has a "dog eared" top right corner, that means that if you use your RMB on it, you will have access to another button option that is hiding underneath. (You could for example have the top button saying Edit for editing existing files, & the button accessed via the RMB, underneath, saying Edit New for creating new files.)
Use external applications on files
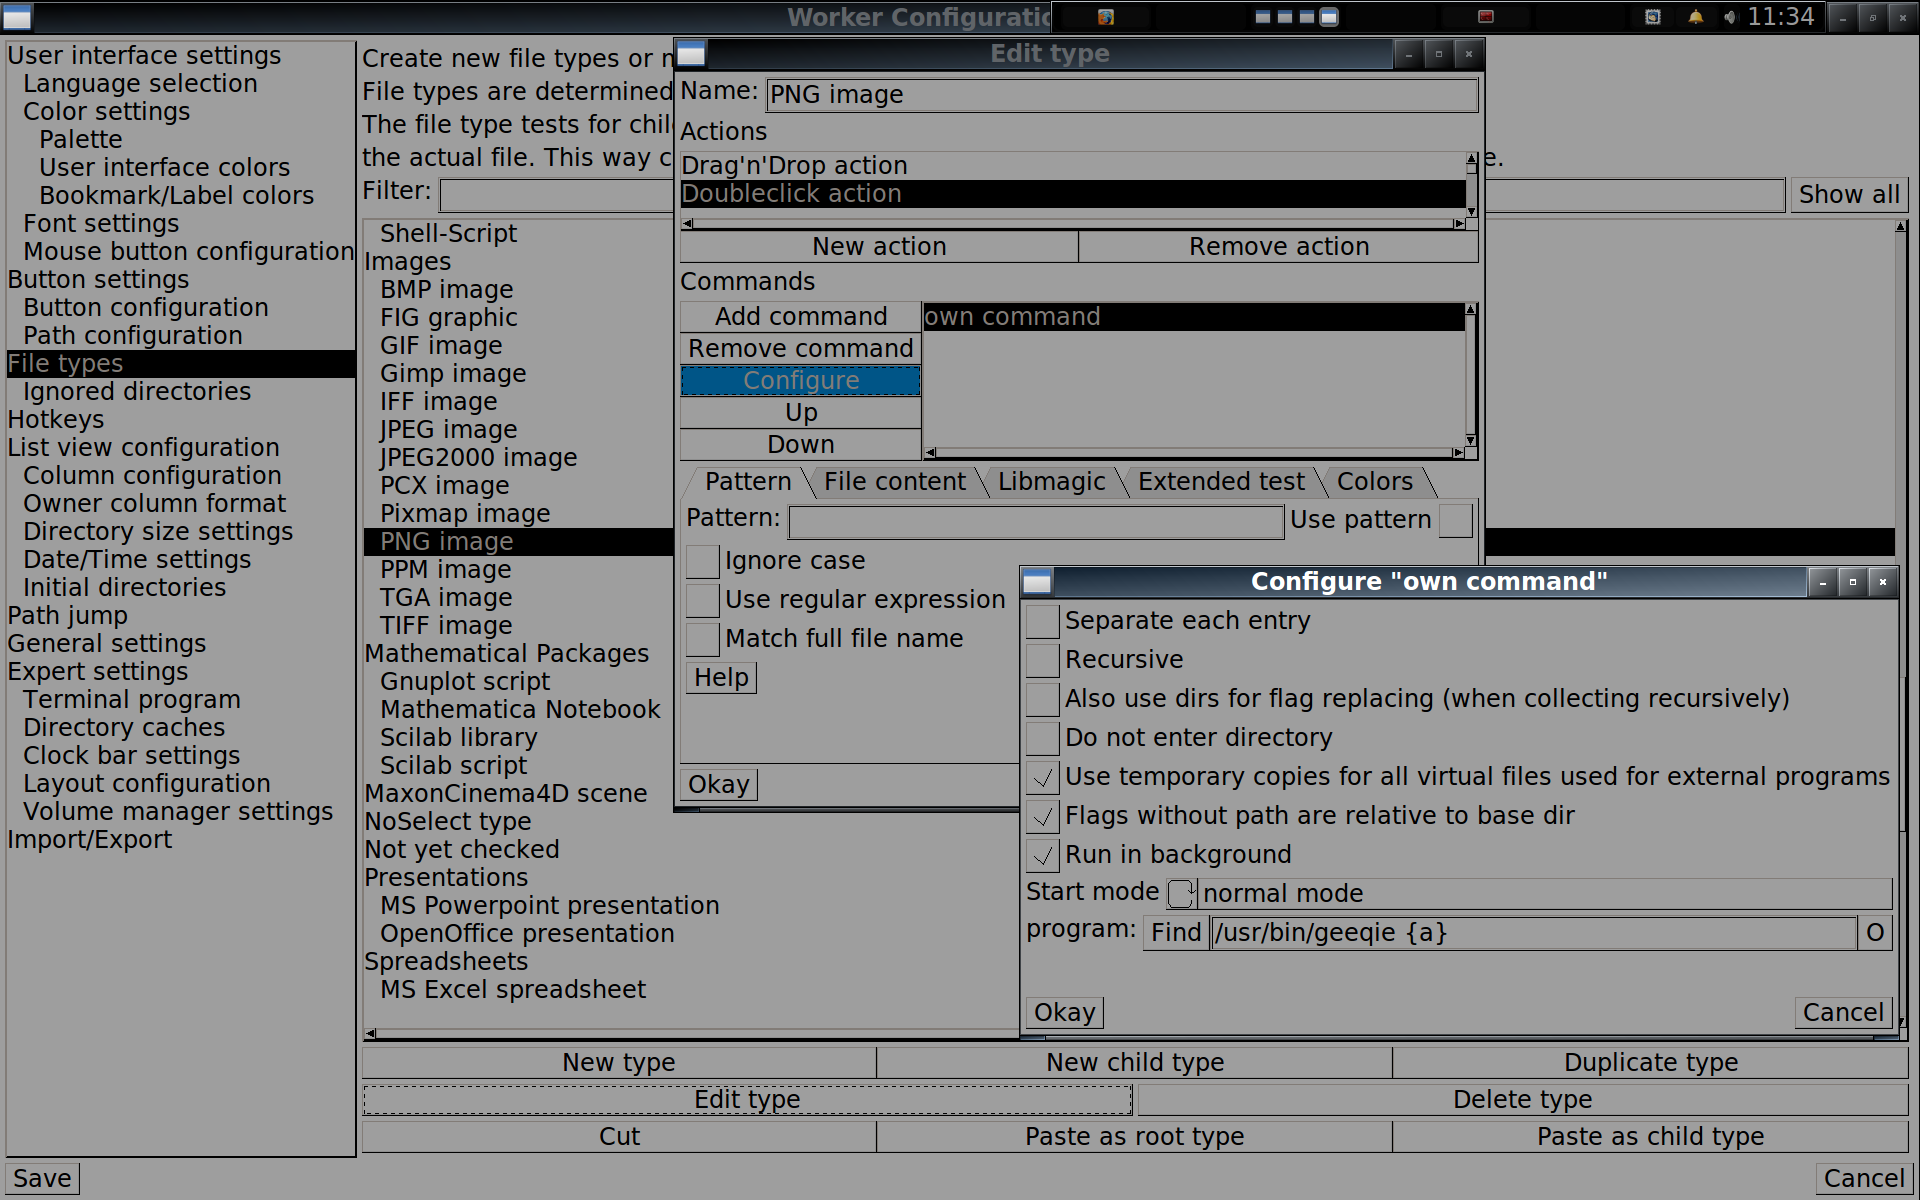
Even though Worker comes with inbuilt text & image viewing abilities, you can also set Worker up to use more powerful external programs. For exmaple, you could use Geegie to view images. By associating Geegie with the various types of image file types available (using the Worker Configuration GUI), when you double click on an image file in the Worker display, Geegie displays it(you could set different image types to be opened by different image viewing or editing programs if you had the need).
You can then view all of the images in that directory by scrolling the mouse wheel, or tell Geegie to go full screen and play a slide show of the images, or do whatever else Geegie will allow you to do with any of the images in that directory.
If you RMB click on the F3 - Show Pics button (yes you can easily set up function keys too), you will see, Edit Pics (the RMB buttons are all in different colours than the top LMB accessed buttons). If you have an image file highlighted in Worker, then your editor of choice will open up with the highlighted file ready to edit.
This can be done for any type of file on your system that you have a program that you want to use to edit/view it. The File Type list included in the Worker Configuration GUI (the list is part shown in an the preceding image) is huge, very highly configurable (something like fourteen different custom user options can be set up) plus you can add custom file types quite easily.
For example, you could use Evince for .pdf files, Firefox for .html files and Leafpad for .txt files. It is possible to setup sudo Leafpad buttons for both creating New files & of course to work on existing files. So you can select a config file in the /etc and then use the Worker sudo Leafpad button on it, which will cause Worker to throw up a terminal window where you have to input your sudo password, then the config file from /etc will be showing in Leafpad & available for me to edit & then save the changes.
You can of course use the buttons to call programs that have nothing to do with any of the files in your Worker display. You can run scripts, simple or complex from a button, as normal user or with root privileges, you can combine applications & scripts & most anything else you can come up with to work in sequence. It is up to your imagination to do what you want to do with Worker.
Worker is built for those that like to customise
This is a part of what I really love about Worker. You can make Worker do what you want it to do & not have to put up with having to do things the way someone else wants you to do it.
This is all fine & good, unless you are someone who loves working with windows & icons. Under those circumstances you would find Worker to be just exactly what you don't want (you may even think that Worker is pre-historic!).
Backup your worker config & use it elsewhere
You can save your custom ~/.worker/config file (it is a REALLY good idea to keep a backup of this file). Apart from saving your configuration from being lost to corruption or whatever, you can transfer your ~/.worker/config file to other installations of Linux. You can also edit the ~/.worker/config file directly with a text editor, which can be useful sometimes.
Edit the worker config file directly
For example, if you transfer worker config file to another system that is using a lower resolution monitor, when you then run Worker with your transferred custom config on that machine, the display will be very wrong making Worker pretty unusable. You may not be access the GUI config to modify the font size, as the large fonts have made it impossible to do so (can't see/access all the necessary parts of the Worker Configuration GUI).
So you can directly edit the ~/.worker/config file with a text editor, scroll down to the font section & change the sizes. Save it, restart Worker, go into the Worker Configuration GUI and adjust/fine tune the config to suit the new machine.
If you ever strike this problem, this is the part of the ~/.worker/config file you need to edit.
fonts {
        globalfont = "-*-verdana-bold-r-normal-*-14-*-*-*-*-*-*-*";
        buttonfont = "-*-verdana-bold-r-normal-*-14-*-*-*-*-*-*-*";
        leftfont = "-*-verdana-bold-r-normal-*-14-*-*-*-*-*-*-*";
        rightfont = "-*-verdana-bold-r-normal-*-14-*-*-*-*-*-*-*";
        textviewfont = "fixed";
}
        xftfonts {
        globalfont = "Sans-18";
        buttonfont = "Sans-20";
        leftfont = "Sans-24";
        rightfont = "Sans-24";
        textviewfont = "Sans-20";
}
By looking at the above you can see that it is the xfgfonts section that is where the large 18 -> 24 size fonts are, so you just make all those numbers suitably smaller, then you can use the Worker Configuration GUI to fine tune your imported settings to suit the new machine.
Making Worker work how you want it to
The above will hopefully give you more of an idea about how Worker functions, you have to make Worker your own, this doesn't happen quickly, but it does get easier once you have understood the basics. You really have to get into the Worker Configuration GUI & have a look around to start to get familiar with it.
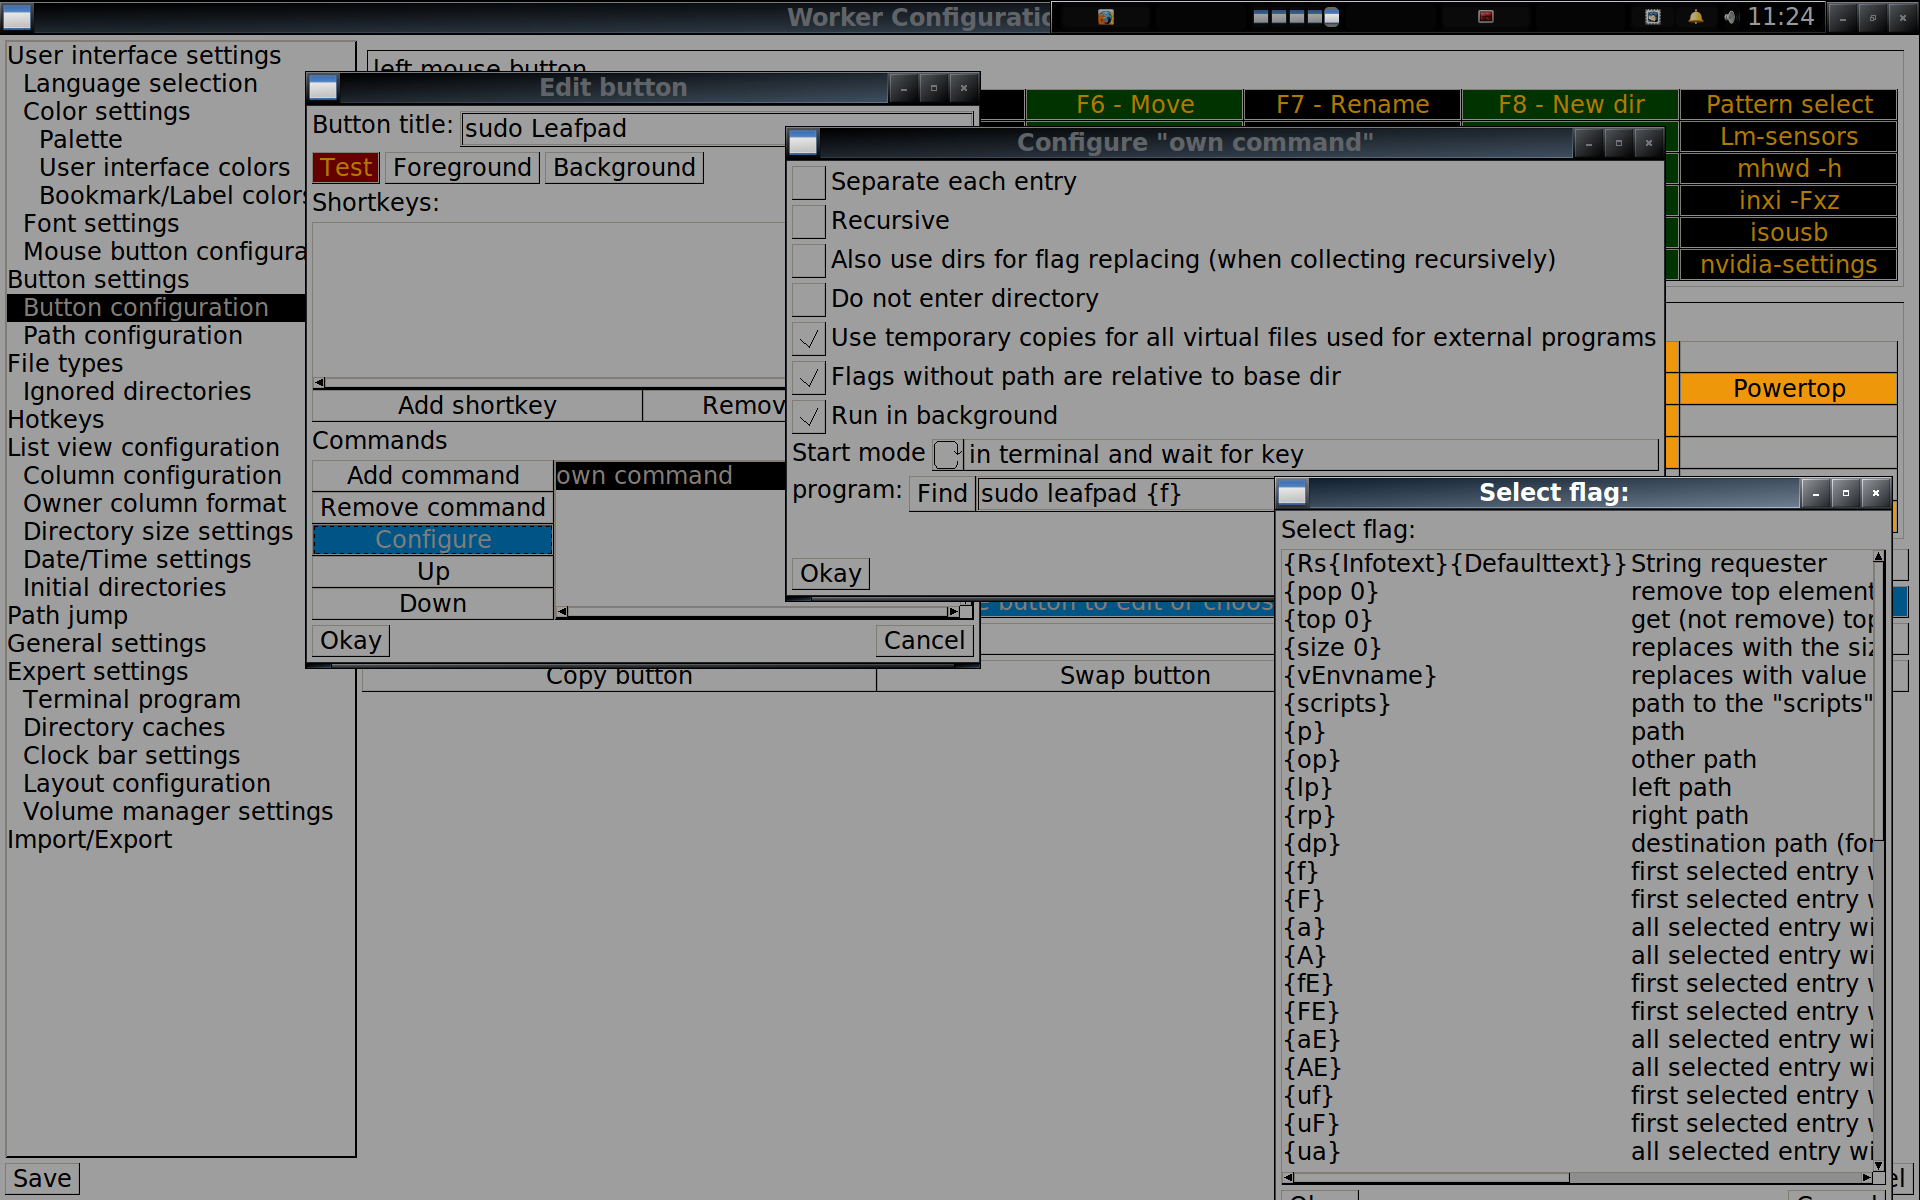
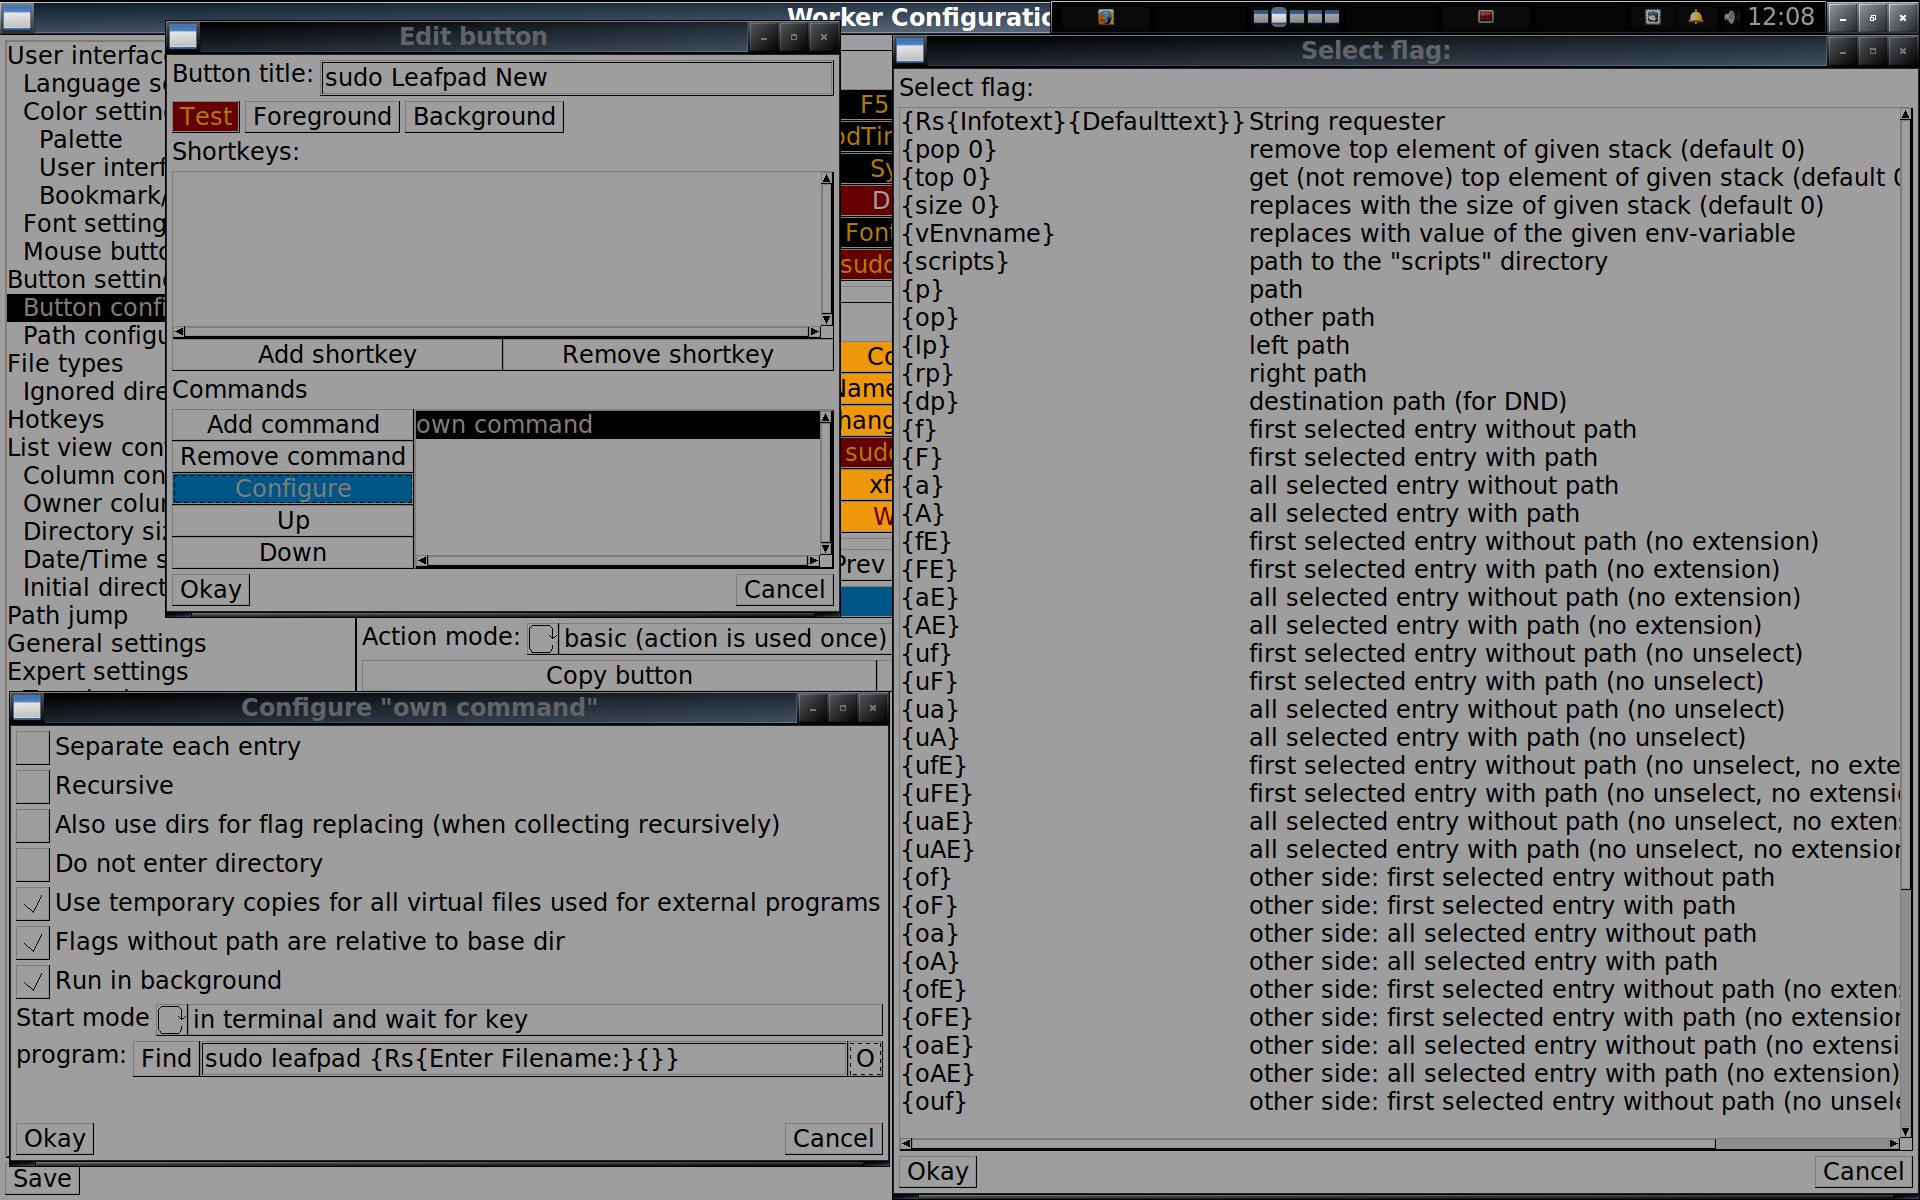
For setting up buttons, look at how other buttons are setup, you will start to see that there are certain options that are native to Worker (like the {f} in the coming example) that are commonly used when you want to open a file that you have highlighted in the Worker display. The following example (is much clearer & simpler than it looks here, when you are actually looking at it in Worker running on your own system).
Options, Options...
There are currently 47 Option flags that can be seen when you hit the O at the end of the program: field, where you enter in your own command as seen in the above two examples, it is right before leafpad .
Of those 47 Options, you probably won't to need to use all of them. When you look at what the options can do, you will see that you can get very sophisticated but it isn't a requirement.
The previous image shows some of those 47 Option flags in the window on the right hand side of the image.
Built-in Commands
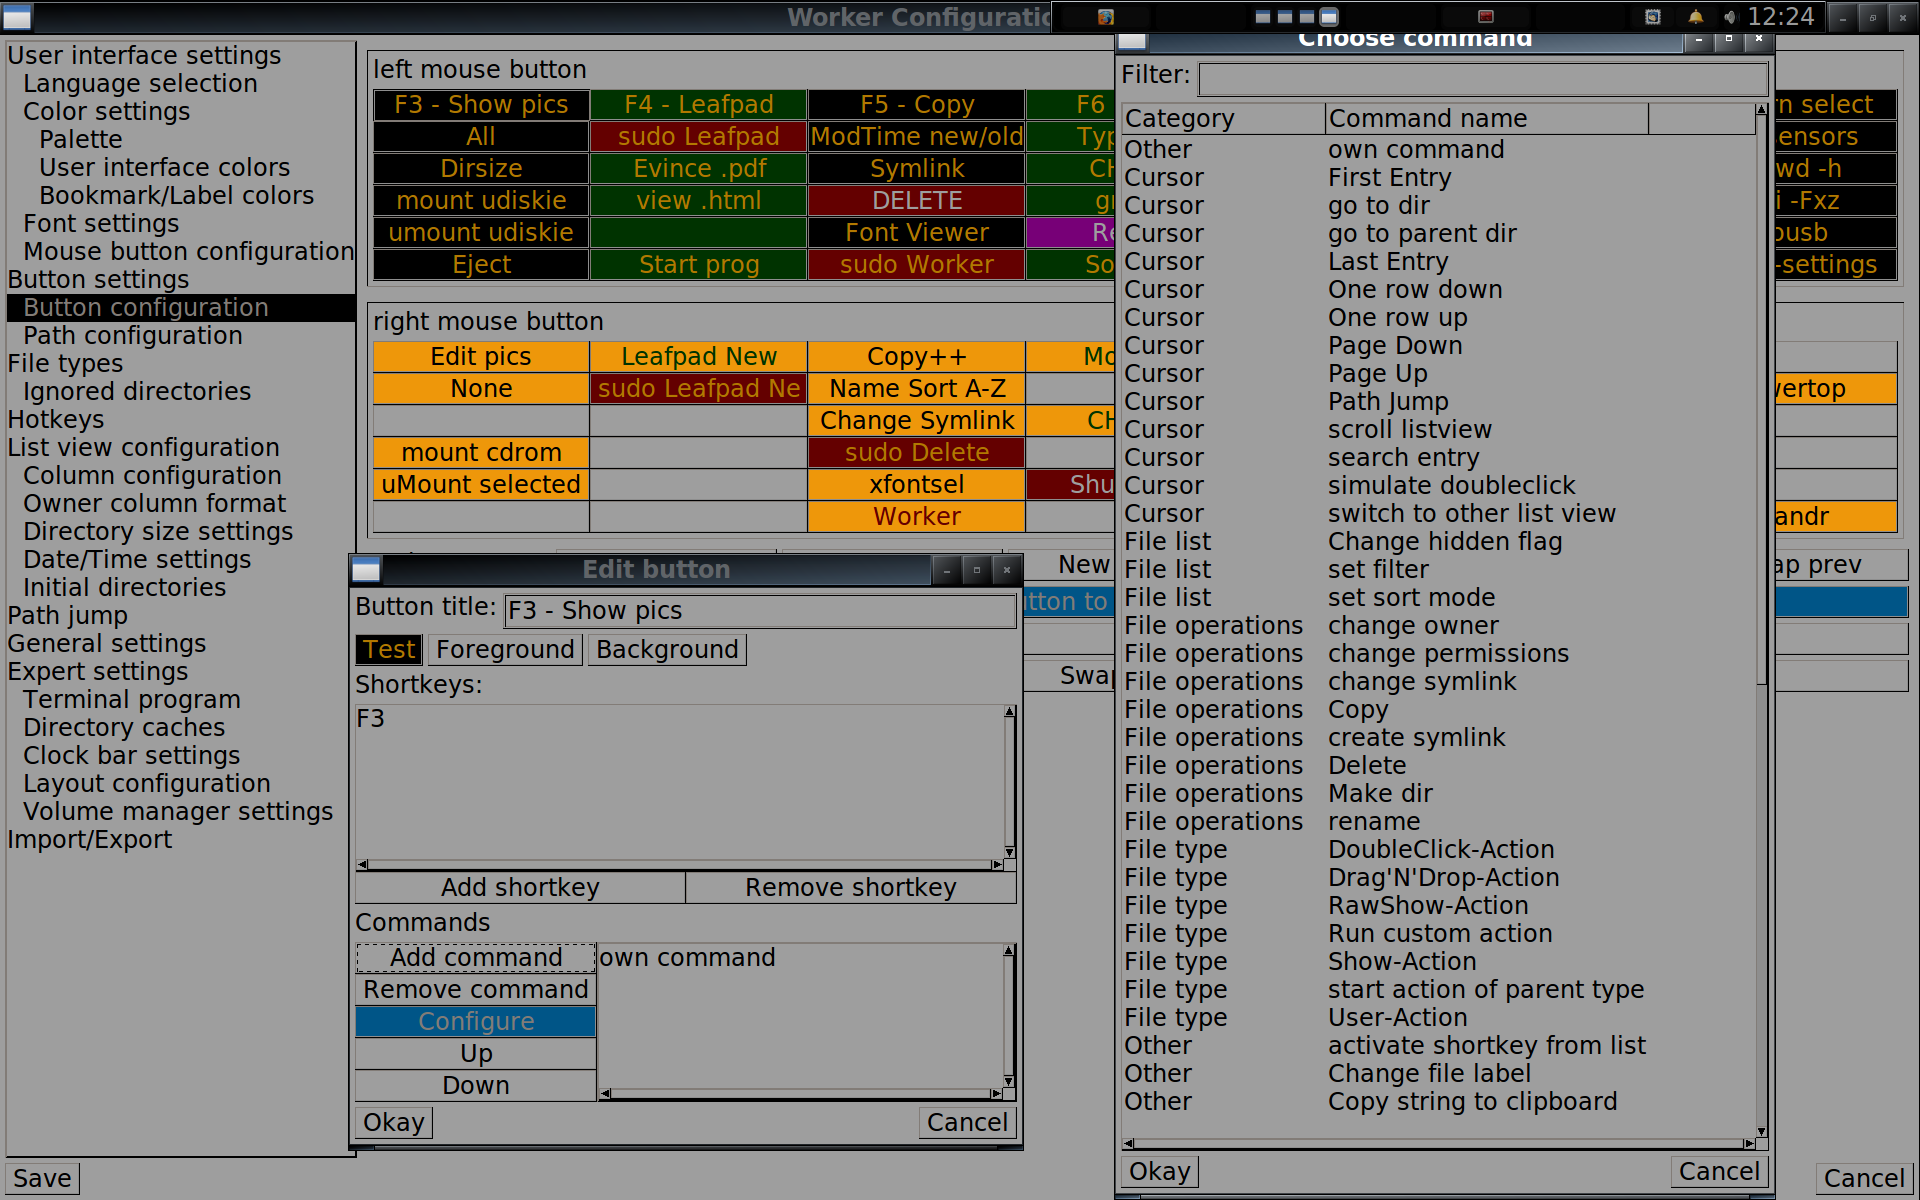
Worker currently also has 61 commands built into it. They are listed when you wish to create a new button (and choose the Add Command button. The following screenshot shows some of those 61 commands.
Sequencing Commands
You can also have more than one command listed in sequence. Meaning that when setting up a button to do what you want, after the creation of a command, instead of OK'ing out of that window, you can add another command. You can continue to repeat this as desired.
The above image already has a command (it uses Geegie to show an image that has been selected in one of Worker's file lists), you can add more commands if you need to sequence them for some reason. The commands can be any mixture of both built-in commands and external programs.
Summary
The Worker filemanager is certainly not one that everyone would want to set up & use. Though for those of us that it does suit, the more we use it, the more we get to know Worker, the more we configure it to be just the way we want it to be.
It is very easy to change the applications that we call from inside of Worker, that we use to work on whatever kind of files in whichever way we have chosen. Worker doesn't mind, that is what it is made for (well, a part of what it is made for).
See Also
You can post any related feedback in the related Forum Topic

